Model Modding
Information on how to use custom models in the game.
Importing Custom Models
Required Tools:
Doom Eternal Model Importer by SamPT - Download
Converts .OBJ format models into the .LWO format used by DOOM Eternal.
Blender - Download
Open-source 3D modeling software.
Blender is highly recommended, but other 3D-modeling software may also work.
How to Import Custom Models:
First, download the "Doom Eternal Model Importer" tool and run it. You will see a screen like this: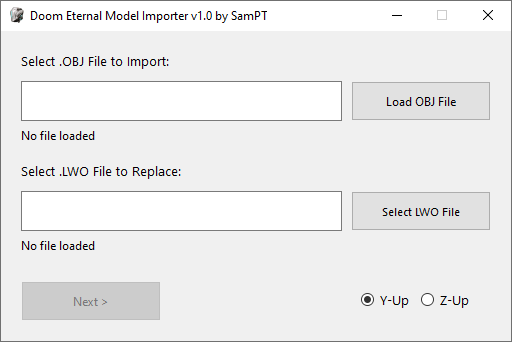
Follow these steps:
1. Click "Load OBJ File" and select the .obj file you want to import.
2. Click "Select LWO File" and select the .lwo file you want to replace - this opens a 2nd window which is similar to SAMUEL, so you can browse the game .resources.
3. Click the "next" button and you'll see a screen like this:

4. Select the material2 .decl you want to use for this model (sometimes there will only be one option). Make a note of the file you picked, because this controls which textures will be loaded for the model.
5. Click "Import Model" - this will convert your .obj file to the .lwo format. Your new .lwo model will be saved to a folder called imports, this will be in the same directory as the model importer tool:

6. Open the imports folder and look for a folder named after the model you replaced (along with some numbers). In this example, the file we replaced was called vial.lwo, so the imported model was saved in a folder called vial_id#15109803643372197552.
7. Open that folder (e.g. vial_id#15109803643372197552) and you'll see two more folders inside. One will be called streamdb and the other will be the name of a ".resources" archive, such as gameresources.

8. Copy and paste both of these folders directly into your Doom Eternal mods folder. (If distributing the mod, you should put them in a .zip file first). This folder contains everything you need to see the model replaced in the game.
9. Run EternalModInjector.bat and you should see the new model in the game.
Important: Custom models will not work with outdated versions of EternalModInjector. To avoid problems, you should add the EternalMod.json file to your completed mod, and set the minimum required version to 19. This will display a warning if someone tries to use your mod with outdated tools.
General Tips / Advice:
- Remember, the model is just the "shape" of the item. In most cases you will also need to replace textures. This isn't handled by the model importer tool. You would do this the same way you'd normally create a texture mod. See the Texture Modding guide for more information.
- If your imported model is facing sideways in the game, try changing the Y-up / Z-up setting on the first screen of Doom Eternal Model Importer.
- If the model you import is too large or small, you need to edit the model with a 3d modeling tool such as Blender. Use this tool to scale your model to the proper size before importing it into the game. (To get an idea of the correct size, you can export a "vanilla" model from the game with SAMUEL, and open that model in Blender, alongside your new one. This will give you a good size comparison).
- When exporting to .obj format from Blender, you should make sure these settings are checked (at minimum):


Note: The current version of the model importer only supports static models (.lwo format). Animated models (.md6mesh format) are not supported yet, so it is not possible to replace things like weapons or enemy models directly. However, you can attach static .lwo models to .md6mesh models to achieve a similar effect. See here: Attaching Static Models to Animated Models
See Also:
- Attaching Static Models to Animated Models
- How to use the "EternalMod.json" file
- Texture Modding guide
Attaching Static Models to Animated Models
Hiding Animated Models:
Find material2 decls for what parts of a model to hide. Replace everything in the decl with the following.
{
	inherit = "template/editor/worldeditor";
	edit = {
		Parms = {
			texturemap = {
				filePath = "art/tile/common/nodraw.tga";
				options = {
					type = "TT_2D";
					filter = "TF_DEFAULT";
					repeat = "TR_REPEAT";
					format = "FMT_RGBA8";
					atlasPadding = 0;
					fullScaleBias = false;
					noMips = false;
					fftBloom = false;
				}
			}
		}
		EditorData = {
			editorImagePath = "art/tile/common/nodraw.tga";
		}
	}
}
This decl can be found in various .resources files at art/tile/common/nodraw.decl. It makes the textures assigned to it unable to see in game.
Attaching Static Models:
It is important to make sure your custom model replaces an existing model that doesn't interfere with gameplay and hasn't been used in a different mod before. Using various mods together that replace the same model for different uses can cause several problems.
When publishing a mod that replaces a static model, you should indicate which static model you replaced. This can help diagnose or avoid compatibility issues with other mods.
Find the FX decl used for the certain model. An easy way to find most of them is to check the fxDecl parameter in most entitydef decls.
In the FX decl, add a new item that uses this example as a base:
			item[11] = { // Change the item number when needed
				name = "assault_rifle";
				group = "fire";
				type = "FX_MODEL";
				looping = true;
				originType = "FX_ORG_TRACK_POS";
				rotationType = "FX_ROT_TRACK_AXIS";
				modelParms = {
					staticModel = "art/kit/hub/prop/pizzabox.lwo"; // The model that will be replaced. When changing the filepath, make sure to add any extra parameters in the .lwo extension if necessary
				}
			}
After adding the new item to the FX decl go to the top of the decl and change "num = <number of items>;" by how many items you added.
Optional Parameters:
- renderWithGunFov - Keeps the custom weapon model at the same position as the FOV. This parameter will have to be added in the ModelParms section of the FX item.
renderWithGunFov = true;
- size - Changes the size of the model.
size = 0.165000007;
- offset - Changes where the model is located.
offset = {
	x = 0;
	y = 0;
	z = 0;
}- rotOffsetAngles - Rotates the model.
rotOffsetAngles = {
	yaw = 0;
	pitch = 0;
	roll = 0;
}- tagNames - Moves the model to a specific body part. Most tags can be found in the FX decl.
tagNames = {
	num = 1;
	item[0] = "muzzle";
}- startCondition and stopCondition - Changes the condition of when the model shows and stops. A full list of conditions can be found in the FX CONDITIONALS page.
startCondition = {
	num = 1;
	item[0] = "FX_WEAPON_BEGIN_RAISE";
}
stopCondition = {
	num = 2;
	item[0] = "FX_WEAPON_BEGIN_LOWER";
	item[1] = "FX_WEAPON_BEGIN_RAISE";
}
Adding Rain FX:
Find the material2 decl for the weapon model you replaced earlier and add the following to the first line of the decl.
inherit = "template/pbr_gun";
Next, you'll have to add the following to the Parms section of the decl.
wetnessdroptiling = 4;
Your material2 decl should look something like this.
{
	inherit = "template/pbr_gun";
	edit = {
		RenderLayers = {
			item[0] = {
				parms = {
					bloommaskmap = {
						options = {
							format = "FMT_BC4";
						}
					}
					colormask = {
						filePath = "textures/system/constant_color/black_noalpha.tga";
						options = {
							type = "TT_2D";
							filter = "TF_DEFAULT";
							repeat = "TR_REPEAT";
							format = "FMT_BC1";
							atlasPadding = 0;
							fullScaleBias = false;
							noMips = false;
							fftBloom = false;
						}
					}
					smoothness = {
						filePath = "textures/system/constant_color/grey_dk.tga";
					}
					normal = {
						filePath = "art/kit/hub/prop/pizzabox_n.tga";
					}
					specular = {
						filePath = "textures/system/specular/flatspec_35.tga";
					}
					albedo = {
						filePath = "art/kit/hub/prop/pizzabox.tga";
					}
				}
			}
		}
		Parms = {
			wetnessdroptiling = 4;
			surfaceemissivecolor = {
				y = 0.690196097;
				z = 0.160784304;
			}
			blendheightmapscale = 4;
		}
	}
}