2. How to Create Mods
Information for people getting started with making their first mods. Covers sound, string, model modding, and multiplayer mods.
- General Information
- Audio Modding
- Extracting Game Audio
- Creating Audio Mods
- Audio File Extensions
- Audio Length (Advanced Guide)
- HIRC Objects (Advanced Guide)
- String Modding
- Model Modding
General Information
Start here for learning how to create mods.
Extracting Resources
In order to create mods, you will need to have the game's resources extracted into the various files that can be edited. Resources are divided by levels or general categories. They will be sorted into folders when extracted.
It is recommend that you extract assets from resources that end in .backup or uninstall all mods before extracting to avoid getting modified files.
Extraction Tools:
EternalResourceExtractor by PowerBall253 - Download
Command-line tool. Exports everything, but textures/models are exported as "headers" only - not for texture mods. You may wish to filter the extraction to .decl files only. CMD Syntax: EternalResourceExtractor.exe [path to .resources file] [out path] [options]
[Documentation & Source Code]
SAMUEL Asset Extraction Tool by SamPT - Download
GUI tool. Exports textures, models, .decls, and .entities files in a readable format.
[Documentation & Source Code]
VEGA by DTZxPorter - Download
GUI tool. Exports textures and models. Preferred tool for texture modding.
Make sure you have enough disk space when extracting resources. As of Game Update 6.66 rev 2, EternalResourceExtractor requires 20.0 GB of free space to extract everything. SAMUEL or VEGA require even more space, since they export full-size images. If using those tools, you should only export the textures you need.
List of Resources:
gameresources contains general information that will be used for all levels.
You will be using this resource frequently.
Resource
|
Description |
| gameresources | General |
| e1m1_intro | Hell on Earth |
| e1m2_battle |
Exultia |
| e1m3_cult | Cultist Base |
| e1m4_boss | Doom Hunter Base |
| e2m1_nest | Super Gore Nest |
| e2m2_base | ARC Complex |
| e2m3_core | Mars Core |
| e2m4_boss | Sentinel Prime |
| e3m1_slayer | Taras Nabad |
| e3m2_hell | Nekravol |
| e3m2_hell_b | Nekravol - Part II |
| e3m3_maykr | Urdak |
| e3m4_boss | Final Sin |
| e4m1_rig | UAC Atlantica Facility |
| e4m2_swamp | The Blood Swamps |
| e4m3_mcity | The Holt |
| e5m1_spear | The World Spear |
| e5m2_earth | Reclaimed Earth |
| e5m3_hell | Immora |
| e5m4_boss | The Dark Lord |
| e6m1_cult_horde | Horde Mode - Cultist Base |
| e6m2_earth_horde | Horde Mode - Reclaimed Earth |
| e6m3_mcity_horde |
Horde Mode - The Holt |
| hub | Fortress of DOOM |
| dlc_hub | ARC Carrier |
| shell | Main Menu |
| pvp_bronco | Battlemode - Celestial |
| pvp_darkmetal | Battlemode - Corrosion |
| pvp_deathvalley | Battlemode - Penance |
| pvp_inferno | Battlemode - Tundra |
| pvp_laser | Battlemode - Forsaken |
| pvp_shrapnel | Battlemode - Torment |
| pvp_sideswipe | Battlemode - Stronghold |
| pvp_thunder | Battlemode - Armageddon |
| pvp_zap | Battlemode - Extraction |
| tutorial_sp | Slayer Tutorial |
| tutorial_demons | Demon Player Tutorial |
| tutorial_pvp_laser | Battlemode - Tutorial |
| warehouse | Skins |
| meta | Contains "container.mask" |
There are folders with "_patch_#" appended at the end and they contain overriding files for their parent folder.
The patch number does not always mean it has a high priority because DOOM Eternal often changes the priorities with each update. You can see the priorities by checking the vanilla version of base/packagemapspec.json. As of update 6.66 rev-2.2, here are the known unusual patch priorities:
- gameresources_patch1 is higher than gameresourcces_patch2.
- e5m1_spear_patch1 is higher than e5m1_spear_patch2.
- e3m1_slayer_patch2 is higher than e3m1_slayer_patch3.
- e2m3_core_patch2 is higher than e2m3_core_patch3.
- e5m3_hell_patch1 is higher than e5m3_hell_patch2.
File Extensions
This is a list of the most common files you'll edit when creating a mod. It is recommend that you download the tools to extract the game resources before continuing. That way, you can reference these files as you go.
.decl File Extension
.decl files (short for "declaration") are the most commonly used files in Doom Eternal modding. They are a form of script or "pseudo-code" that is interpreted by the game engine. Many of the variables and numeric values used by the game are defined in these files. They can be edited with a text editor.
Filepath:<resource>/generated/decls
Example:gameresources/generated/decls/weapon/weapon/player/rocket_launcher.decl
> File to edit the Rocket Launcher.
.entities File Extension
The .entities file contains all of the data in a map/level except geometry — if you want to make a level mod, you will need to learn how to edit the .entities file. These files are stored compressed, and require a tool to decompress them. After that, the file can be edited with a text editor.
Filepath:<resource>/maps/game/<campaign>/<level_name>/<level_name>.entities
Example:e1m1_intro_patch1/maps/game/sp/e1m1_intro/e1m1_intro.entities
> Level file path for Hell on Earth.
.tga File Extension
These are texture files. If you want to create custom skins or other artwork, you will most likely be editing these .tga files. Not everything "visual" is a .tga file. Many of the game's particle effects, lighting effects, and other visual effects are controlled by .decl files instead.
Texture editing software is required to edit .tga files.
Filepath:<resource>/models and <resource>/art
Example:gameresources/models/monsters/arachnotron/*
> Texture files for the Arachnotron's model.
Despite the name, the ".tga" files used in Doom Eternal are not actually .tga (targa) images. You will need to use a tool such as SAMUEL or VEGA to extract them in a usable format (.dds, .png, or .tiff).
Creating Mods
Getting Your Mod to Work:
- For your mod to function in the injector, you must have your folder structure EXACTLY the same as it is structured in the extracted files.
- When making mods, you should copy only the files you need to edit. Do not change anything in the extracted files so you can reference them again in the future.
- Be sure to check if your mod is in the highest priority it can be. Editing something in "gameresources" may not work if it is found in "gameresources_patch1".
Here is a list showing the resource load priorities, from top to bottom - You can find the top-to-bottom resource load order in #resources, called "PackageMapSpec.json sheet".
- When finished with your mod, put all the contents into a .zip file. When testing your mod, you do not necessarily have to make it a .zip file. You can just move the folders into the "Mods" folder for your convenience.
If you are having trouble, you can always look at another person's .zip mod for reference.
Updating Your Mod:
- When DOOM Eternal updates, the resource load order will often change and will sometimes break your mod.
- Updating your mod can often be as simple as moving your files to it's higher priority, which you can tell if you see those files moved into another patch.
- Still, you should test your mod to see if anything has changed. Sometimes ID Software makes extra changes that can be hard to identify or revert.
Command Prompt Tips
There are thousands of extracted files available and sometimes it can be difficult to locate what you need.
On the Windows Operating System, you will be using the Console Command Prompt (CMD).
To access it, simply type "command prompt" or "cmd" in the search bar.
Windows PowerShell also works.
Change Directory
It will be much easier issuing commands when changing the current directory.
You should be changing the directory to the folder where you extracted all your files.
Windows and Linux | cd
The Change Directory command for Linux and Windows is the same.
Syntax:cd [directory]
Example:cd C:\Users\Username\Desktop\Extracted Files
On Windows:
An easy way to change directories in is to navigate to the directory in File Explorer, select the upper list that names all the folders in your directory (usually starting with "This PC"), copy what is listed, then paste it into CMD.
Create Directory
Rather than making directories one at a time graphically, you may find it easier to create an entire path in one command.
Windows and Linux | mkdir
The base command, mkdir, is the same on both Windows and Linux, however the flags are different.
Syntax:mkdir [directory/path]
Example:mkdir warehouse_patch1/generated/decls/material2/art/weapons/supershotgun/skins/techhell/
On Linux:
You need the -p flag to create directories recursively if their parents don't exist. If your Linux distribution does not do so automatically, add an alias to the config file for your favorite shell so that you can just type mkdir without the -p.
Find String
To find specific text strings within a file or group of files.
Useful for finding .decl files.
Windows | findstr
Syntax:findstr /arguments "text" [filename]
Example:findstr /si "ai/fodder/imp_stone" e5m1_spear\generated\decls\*
> This example command will list out the .decl files that define the Stone Imp as an entity to be spawned in The World Spear.
> The /si argument makes the command also search sub-directories of the file and ignore case-sensitivity.
> The * at the end is a wildcard, meaning that it will search for everything within the decls folder.
Although the Windows file structure divide their directories with the back slash ("\"), the extracted files will reference directories using the forward slash ("/"). You can see this in the example for findstr above.
Linux | grep
Syntax:grep -arguments "text" [filepath]
Example:grep -ir "ai/fodder/imp_stone" e5m1_spear/generated/decls/*
The -ir arguments make the command search sub-directories recursively and ignore case-sensitivity. If you intentionally want a case-sensitive search, you can leave out the -i flag and use just -r.
For Linux, the directories use the forward slash ("/") just like how the extracted files do.
Sometimes a surplus of results will print out depending on how vague the key term is.
File Compare
Compares the difference between two files line-by-line.
Useful for comparing a modded file with its original version.
Diffchecker | https://www.diffchecker.com
The Diffchecker website compares differences and similarities between 2 code syntax.
Select all syntax of the original .decl file and copy it over to one of the fields. Then do the same for the modified .decl file.
Windows | fc
Syntax:fc /arguments [file1] [file2]
Example:fc /n "e5m3_hell\generated\decls\aiupgrades\buffpod.decl" "test_buffpod.decl"
Linux | diff
Syntax:diff -arguments [file1] [file2]
Example:diff "e5m3_hell/generated/decls/aiupgrades/buffpod.decl" "test_buffpod.decl"
EternalMod.json
You can provide additional info for your mod by creating a file called "EternalMod.json" in the .zip file alongside the rest of your resource folders.
This file is not required when creating mods, but it can be helpful for users when organizing their mods.
Create the file EternalMod.json as shown:
Usage:
{
	"name":"", \\ Mod Name
    "author":"", \\ Mod Author
	"description":"", \\ Mod Description
	"version":"", \\ Version Number
	"loadPriority":0, \\ Injector Load Priority
	"requiredVersion":0 \\ Required Mod Loader Version
}
Example:
{
	"name":"My First Mod",
    "author":"Newbie Modder",
	"description":"This is my first Doom Eternal Mod.",
	"version":"1.0",
	"loadPriority":500,
	"requiredVersion":14
}
These contents are only visible for users if they are using the GUI-based application, EternalModManager.exe which comes packaged with the Mod Injector.
Loading Priorities:
Manually setting loading priorities can be helpful when considering file conflictions with other mods.
loadPriority has greater importance than the other fields as it determines what order the mod will be injected.
By default, the value is 0. The higher the number, the sooner the individual mod will be injected.
Load priority numbers can get to the negatives.
The Mod Injector loads its mods from highest load priority to smallest, meaning that if two mods change the same files, the mod with the smaller load priority number will override the mod with the larger load priority number.
Required Version:
requiredVersion refers to the version number of the Mod Loader, known as DEternal_loadMods.exe and not the Mod Injector itself.
To figure out what the current Mod Loader version, issue type in a command prompt:
"DEternal_loadmods.exe --version"
Be sure to be in the same directory as the .exe file before issuing the command.
See Also:
Audio Modding
Information for people who are looking to create Music, Sound Effect, and Voice Over mods.
Extracting Game Audio
It is recommended to do all of your extracting in the SAME disk drive (ex: C:\)
Extracting Tools
EternalAudioExtractor by proteh - Download
Exports WEM & OPUS audio from SND files for Windows OS.
EternalAudioExtractorLinux by PowerBall253 - Download
Exports WEM & OPUS audio from SND files for Linux OS.
Make sure you have at least 2.00 GB of storage if you plan on extracting music.
550 MB for sound effects, 50 MB for voice overs (for each language).
Extraction Instructions
Instructions are for Windows users.
- Extract the contents of EternalAudioExtractor somewhere on your machine.
- Launch either "Extract_All.bat" or "Extract_Single.bat" depending if you want to extract all sound files or from a single directory.
- Copy and paste the filepath of your DOOMEternal installation directory.
( ex: C:\Program Files (x86)\Steam\steamapps\common\DOOMEternal ) - Input the name of the .snd file you want to extract (if applicable).
- Input the name of the output directory. Make sure the directory is either empty or nonexistent.
- If you are extracting music files, press [Y] to enable automatic .ogg conversion.
- If necessary, press [Y] again to enable the extraction of unused sound files.
- If everything looks correct, press [Y] to extract its contents.
- Press [Y] to close the batch script open the output folder in a new window.
Music files must be in the OGG sound format before they can be edited.
Unused game audio (represented only by ID) cannot be referenced in-game.
List of Resources
| Resource Name | Information |
| music.snd | Contains WEM music files for Base Game & DLC1 |
| music_patch_1.snd | Contains WEM music files for DLC2 |
| music_patch_2.snd | Contains WEM music files for Horde Mode |
| sfx.snd | Contains OPUS sound effects files for Base Game |
| sfx_patch_1.snd | Contains OPUS sound effects files for DLC1 |
| sfx_patch_2.snd | Contains OPUS sound effects files for DLC2 |
| sfx_patch_3.snd | Contains OPUS sound effects files for post-DLC2 |
| vo_English(US).snd | Contains OPUS voice over files for Base Game & DLC1 |
| vo_English(US)_patch_1.snd | Contains OPUS voice over files for DLC2 and after |
| vo_French(France).snd | Contains OPUS voice over files for Base Game & DLC1 |
| vo_French(France)_patch_1.snd | Contains OPUS voice over files for DLC2 and after |
| vo_German.snd | Contains OPUS voice over files for Base Game & DLC1 |
| vo_German_patch_1.snd | Contains OPUS voice over files for DLC2 and after |
| vo_Italian.snd | Contains OPUS voice over files for Base Game & DLC1 |
| vo_Italian_patch_1.snd | Contains OPUS voice over files for DLC2 and after |
| vo_Japanese.snd | Contains OPUS voice over files for Base Game & DLC1 |
| vo_Japanese_patch_1.snd | Contains OPUS voice over files for DLC2 and after |
| vo_Polish.snd | Contains OPUS voice over files for Base Game & DLC1 |
| vo_Polish_patch_1.snd | Contains OPUS voice over files for DLC2 and after |
| vo_Portuguese(Brazil).snd | Contains OPUS voice over files for Base Game & DLC1 |
| vo_Portuguese(Brazil)_patch_1.snd | Contains OPUS voice over files for DLC2 and after |
| vo_Russian.snd | Contains OPUS voice over files for Base Game & DLC1 |
| vo_Russian_patch_1.snd | Contains OPUS voice over files for DLC2 and after |
| vo_Spanish(Mexico).snd | Contains OPUS voice over files for Base Game & DLC1 |
| vo_Spanish(Mexico)_patch_1.snd | Contains OPUS voice over files for DLC2 and after |
| vo_Spanish(Spain).snd | Contains OPUS voice over files for Base Game & DLC1 |
| vo_Spanish(Spain)_patch_1.snd | Contains OPUS voice over files for DLC2 and after |
Creating Audio Mods
See Extracting Game Audio before proceeding.
Instructions are for Windows users.
Audio Editing
Download an audio-editing tool of your choice, such as Audacity - Download
- Import the OGG or OPUS files and edit them in your audio-editing tool.
- Make sure that your edits match the start and end length of the audio track.
- SFX & VO: Convert all of the audio you want to export to OPUS.
( Export Audio -> OggOpus - 64 kbps for high quality ) - MUSIC: Convert all of the audio you want to export to WAV. ( 32 bit for high quality )
FFmpeg ( SFX & VO ) - Eternal Mod Injector
You need the FFmpeg extension for Audacity to import/export OPUS audio files - Download
- Install ffmpeg-win-#.#.#.exe -> Follow the installation instructions
- Open Audacity -> Edit -> Preferences -> Libraries
- FFmpeg Library: Locate... -> Browse... -> Find avformat-55.dll -> OK
Be sure to export the OPUS file in either mono or stereo depending on the format of the original file.
Sometimes, Audacity will automatically find avformat-55.dll
If the exe version does not work, download the zip option and extract it into a new folder called ffmpeg-win-#.#.# (depending on the version number) and extract all its contents in there. Then attempt to locate FFmpeg.
Wwise Launcher ( MUSIC ) - Eternal Mod Injector & idStudio
Create an audiokinetic account (use free trial) and install Audiokinetic Launcher - Download
Install Wwise Version 2022.1.18.8567 for the best experience.
- Go to Wwise Launcher -> WWISE -> Launch Wwise (64-bit) -> New (Project Launcher) -> Provide it a name -> Select None (Import assets to project) -> OK
- Close (License Manager) -> Property Editor (SHIFT + K) -> Source Settings -> Default Conversion Settings ... -> Factory Conversion Settings / Vorbis / Vorbis Quality High -> OK -> OK
- Audio File Importer (SHIFT + I) -> Add Files... -> Select your WAV files -> Open -> Import
(Replace any if needed) - Project -> Convert All Audio Files... -> Check Windows (If it is not already checked) -> OK
- File Manager (SHIFT + F1) -> Right Click Project Folder Directory -> Open Containing Folder -> .cache\Windows\SFX (It is recommended to bookmark this directory)
- Be sure that the exported WEM files end with _3F75BDB9
Exported WEM files for idStudio SFX end with _9D0E2A85
For idStudio mods, SFX & VO need to be converted with Wwise with the PCM Auto Detect High Default Conversion Setting. See: https://wiki.eternalmods.com/books/0-idstudio/page/how-do-i-create-idstudio-mods
Injecting Audio
- In your DOOMEternal\Mods folder, create a folder called named based on where the file was originally found.
( ex: music_patch_1 ) - Copy your converted WEM file(s) in there and make sure they have the same name as extracted files.
( ex: samuelsbase_music_main_heavy_0_0_id#15098487.wem ) - Run the EternalModInjector like normal.
Audio File Extensions
These are the audio file types you will be interacting with.
.ogg
Extracted music files from "music", "music_patch_1", & "music_patch_2" will be converted to this format if they are to be edited.
OGG files CANNOT be re-injected into DOOM Eternal.
Example:cultist_base_music_main_heavy_0_id#156134790.ogg
.opus
Extracted sound effect & voice over files from "sfx", "sfx_patch_1", "vo_English(US)", etc will be in this format.
OPUS files CAN be re-injected into DOOM Eternal.
Example:ammo_bfg_id#373311939.opus
.wav
Edited music files must be converted into the WAV format before they can be converted into WEM files.
WAV files CANNOT be re-injected into DOOM Eternal as music files, but they CAN as sound effects & voice overs.
Example:cultist_base_music_main_heavy_0_id#156134790.wav
.wem
After the edited music files have been converted into the WEM format, they CAN be re-injected into DOOM Eternal.
Example:cultist_base_music_main_heavy_0_id#156134790.wem
.snd
These contain the audio files. They CANNOT be directly modified by a conventional audio editor.
Instead, tools are used to extract individual audio audio files.
Example:music.snd
.pck
These contain the audio resources. They CANNOT be directly modified by a conventional audio editor.
However, Fusion Tools can directly modify PCK files.
Example:mus.pck
If a WEM file has been exported correctly (Vorbis Quality High), they should have "_3F75BDB9" before its WEM extension. You will need to delete the "_3F75BDB9" in the WEM file's name before you can inject it into DOOM Eternal.
PCK files modified by Fusion Tools are not supported by DEternal_loadMods,
which is a program that allows certain mods type to be injected.
See Creating Audio Mods for more information.
Audio Length (Advanced Guide)
See Extracting Game Audio & Creating Audio Mods before proceeding.
This is an Advanced Guide, you are expected to have a decent understanding of how audio (primarily music) flows in DOOM Eternal.
Backup your PCK files
Find the location of whichever PCK file you want to edit - mus, sfx, vo_english, etc.
( ex: C:\Program Files (x86)\Steam\steamapps\common\DOOMEternal\base\sound\soundbanks\pc )
Copy them over to a safe location, this will be the file that you will edit.
You may copy an additional PCK file if you want to backup the original.
Fusion Tools
Fusion Tools is an advanced sound editor. For the case of DOOM Eternal, you will use it to export/import the BNK that allows you to edit music length and their start/stop positions.
Fusion Tools - Download
Exporting the BNK file (Into the XML Format)
Extract the contents of Fusion Tools and put FusionTools.exe somewhere safe.
- Launch FusionTools.exe
- Wwise Editor
- File options (top left of the window)
- Open File
- Navigate to where you copied the PCK file that you want to edit
( You may get a warning that the PCK file does not have any WEMs, just select okay and ignore it ) - Show BNKs embedded in the file (3rd option on the top bar)
- In the new window, right click any option available -> Edit BNK (mus.pck only has 1 Embedded BNK)
- In the new Window, select: Export/Import HIRC section to/from an XML file (4th option on the top bar)
- Export HIRC (Export it somewhere safe, do not change the name of the file)
Editing Sound Properties
Proceed after your sound files are in the proper, inject-able format.
Save a copy of the XML file if you want to reference the unmodded piece.
Open the XML file in any XML viewer. Notepad++ works just fine - Download
- Find the sound IDs that appear at the end of each extracted sound file.
For music, you will see 2 of them, they are the SourceID. - The parent ID, or just ID, encompasses the entire track.
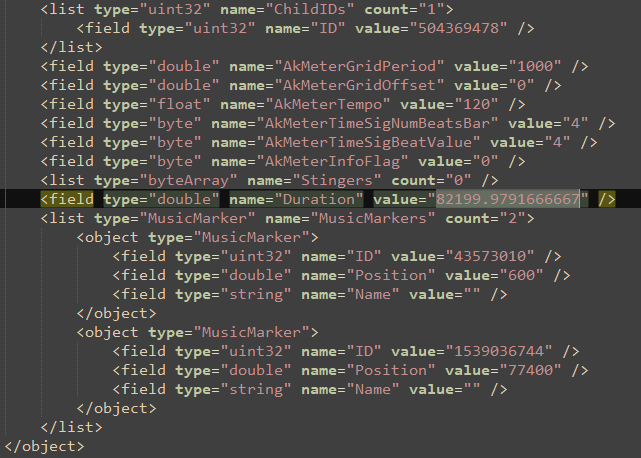
- There are 2 locations where the SourceDuration is held for each track. The duration is measured in milliseconds.
- Each can be changed to the desired amount, but for simplicity's sake, they should be identical.
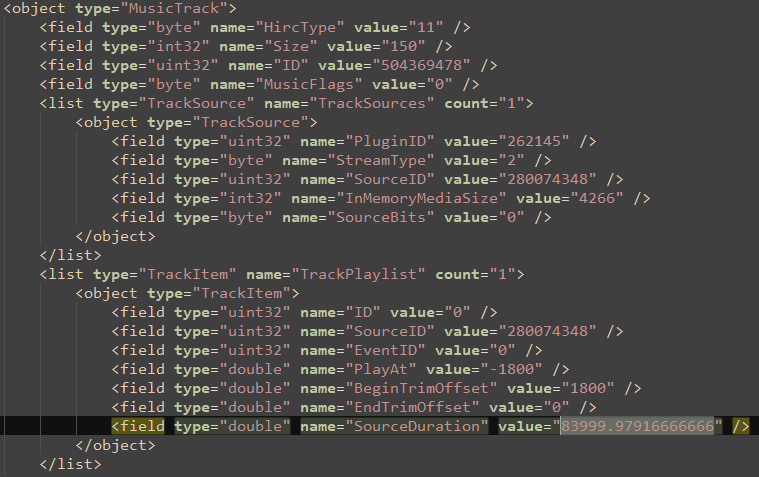
- PlayAt determines when the track actually starts. For the most part, this is unnecessary,
so it should be changed to 0. It is measured in milliseconds. - BeginTrimOffset & EndTrimOffset determine when the track plays and when it cuts off.
The negative amounts means it triggers from the end of the duration to the specified location.
It is recommended to set both of those values to 0. They are measured in milliseconds. - MusicMarkers are what determines when the current track starts and when the next track will start.
Change their positions to the appropriate amounts. They are measured in milliseconds.
ID 43573010 is when the current track starts
ID 1539036744 is when the next track starts (the current track ends)
Keep in mind that MusicMarkers do not cut off the music. The BeginTrimOffset & EndTrimOffset do that.
- AutomationItems cause the music to fade in or fade out.
For most instances, they are unnecessary and can be removed. They are measured in seconds.

Change the contents from the image above to the one below.

It might be helpful to keep AutomationItems and alter them based on the modded track.
To modify music volume, go to the MusicSequence object that contains the DirectParentID for each MusicTrack and find "Prop".

Change the field type to "float", from "uint32" and the value to an existing value of a different number.
The higher the value, the louder the track, and vice versa.

The following are valid float values for Prop (from quietest to loudest):
1056964608
1065353216
1073741824
1077936128
1080033280
1082130432
1083179008
1084227584
1086324736
1090519040
1093664768
1094713344
1098907648
1099431936
If there are no Props or it is set to 0, you can add it. Here is a sample you can copy and paste into your XML file.
                <list type="Prop" name="Properties" count="1">
                    <object type="Prop">
                        <field type="byte" name="ID" value="0" />
                        <field type="float" name="Value" value="1086324736" />
                    </object>
                </list>
Music IDs are organized by category (Ambient, Light, Heavy, etc).
They are measured alphabetically, in the same format as File Explorer if organized by name.
It is up to your best judgment to listen by ear if you want to match the length & music markers accurately.
Importing the XML file into PCK
- After changes are made to the exported XML file, save it, then go back to the last Fusion Tools window.
- Export/Import HIRC section to/from an XML file (4th option on the top bar)
- Import HIRC
- Go to the first Wwise Editor - Ready window -> File options
- Save file -> Save as the same name as the PCK file that was edited
( ex: mus.pck )
As of current time, the Eternal Mod Injector does not support PCK files.
The modded PCK file must be manually switched between the vanilla file.
Alternatively, the Eternal PCK Installer script can be used for easier .pck file replacement/restoration.
See Also
HIRC Objects (Advanced Guide)
See Audio Length (Advanced Guide) before proceeding.
HIRC (Hierarchy) Objects
These are the components to the PCK files. They are separated by <object> in the exported XML document.
Music
Attenuation
Determines the force reduction of the overall audio. It is measured by "Curves" which can be scaled by "GraphPoints" using an "Interpolator".
MusicTrack
Actual components to each individual music track. It determines the "Duration" and "TrimOffSets" of the track.
MusicSegment
Immediately following a "MusicTrack" is its "MusicSegment". It also determines the "Duration", but it establishes "Music Markers" which actuates when the track starts and ends.
MusicSequence
Contains the list of all "MusicTracks" that will play in the sequence. It determines the the "TransitionRules" and "Destination Rules" for each Music Track.
MusicSwitchContainer
Decides when the "MusicTracks" start playing. It is structured much like a "MusicSequence".
EventAction
Directly responsible for starting and stopping the music.
Event
Immediately following an "EventAction". This is the individual event that holds the ID which will start or stop.
String Modding
Information for people who are looking to create mods that affect Text.
Extracting Strings
See Extracting Resources before proceeding. You must have gameresources.resources extracted.
A string is a sequence of characters (text) that appears literally.
Extracting Tools
BlangJsonGeneratorUI by PowerBall253 - Download
Modifies BLANG files and exports the changes as JSON.
BlangJsonGenerator by PowerBall253 - Download
Exports BLANG files into JSON, a format that can be edited with raw text editor, such as Notepad++.
BlangParser by proteh - Download
Directly modifies BLANG files with a simple GUI.
Currently, there are no released packages for BlangParser.
You will either need to find a compiled version in the 2016+ Modding Discord server
or compile it with a C# compiler.
Each BLANG file usually range from 1.5 MB to 2 MB of storage.
Finding BLANG files
- As of Update 6.66 - Rev 1.1, the highest-priority string files are located in gameresources_patch1\strings from your resource output directory.
- Copy any language BLANG file of choice and paste is somewhere safe.
This will be the string file that you will modify.
Extraction Instructions ( BlangJsonGenerator )
It is recommended to create a folder containing both "BlangJsonGenerator.exe" and the unmodified BLANG file.
- Run "BlangJsonGenerator.exe".
- Select option 1.
- Input the name of the .blang file. ( ex: english.blang )
- Input the language name. ( ex: english )
- Input the name of the output file. ( ex: english.json )
- Close the executable.
- You may now edit each string value. See Creating String Mods for more information.
The output folder must end with .json
List of Resources
| Resource Name | Information |
| english.blang | Contains strings for the English language |
| french.blang | Contains strings for the French language |
| german.blang | Contains strings for the German language |
| italian.blang | Contains strings for the Italian language |
| japanese.blang | Contains strings for the Japanese language |
| latin_spanish.blang | Contains strings for the Latin American Spanish language |
| polish.blang | Contains strings for the Polish language |
| portuguese.blang | Contains strings for the Portuguese language |
| russian.blang | Contains strings for the Russian language |
| simplified_chinese.blang | Contains strings for the Simplified Chinese language |
| spanish.blang | Contains strings for the European Spanish language |
| traditional_chinese.blang | Contains strings for the Traditional Chinese language |
Creating String Mods
See Extracting Strings before proceeding.
Make sure to backup the unmodified BLANG file.
Strings can be added to BLANG files, but you must reference them with decls files.
String Editing ( BlangJsonGeneratorUI )
- Extract the contents of BlangJsonGenerator-*.zip.
- Open BlangJsonGenerator.exe, then go to File -> Open blang file... to edit an existing BLANG file, or to File -> Open blang from .resources file to edit a BLANG file contained in a .resources file. You can also go to File -> New... to create a new BLANG JSON mod from scratch.
- You should now see something like this:
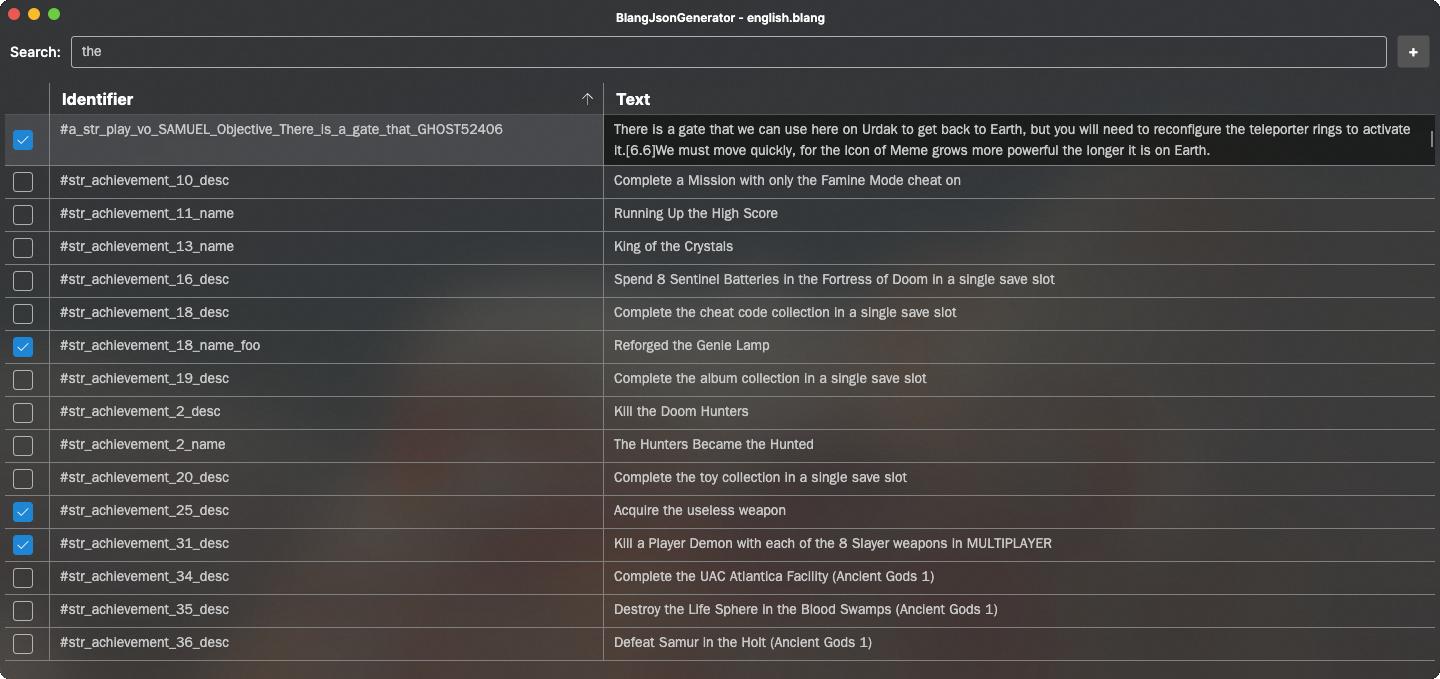
- You may edit any string Identifier or Text you wish.
- To add a string, use the + button in the top-right corner.
- After modifying the strings go to File -> Save... -> Give it the same name as its original BLANG file, with the extension changed to JSON. (ex: english.json).
- Create the following folder directories in your DOOMEternal\Mods folder:
gameresources_patch1\EternalMod\strings
- Copy your modified JSON file into the strings folder.
- Run the EternalModInjector like normal.
String Editing ( BlangJsonGenerator )
Any unused string can be deleted, so it can be compatible with other mods that affect other strings.
- Create a backup for the string JSON file.
- Open the string JSON file. ( ex: english.json )
- The strings should be formatted like this:

- If they are not, see the Extracting Strings page, under Extraction Instructions: ( BlangJsonGenerator )
- Go to the Replace tab (CTRL + F) -> Replace -> Search Mode: Check Regular expression
- Input the following and select Replace All for each:
1) 
"identifier":
"name":
The "Replace with : " box is empty for screenshot 2.
2) 
"modified": 0
The "Replace with : " box is empty for screenshot 3.
3) 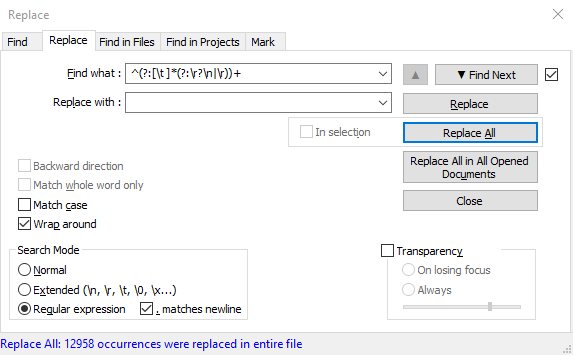
^(?:[\t ]*(?:\r?\n|\r))+
- The results should be formatted like this:

- The JSON file is now in a format that can be properly re-injected into DOOM Eternal.
Save a backup of this JSON file as well, so you would not need to go through this process again
(before the next DOOM Eternal update). - Find the strings that you wish to modify. (CTRL + F)
- After modifying the strings of your choice, delete all other unmodified strings.
- Save your modified JSON file with the same name as it was exported. ( ex: english.json )
- Create the following folder directories in your DOOMEternal\Mods folder:
gameresources_patch1\EternalMod\strings
- Copy your modified JSON file into the strings folder.
- Run the EternalModInjector like normal.
The commas "," at the end of each string name and text are unnecessary and can be deleted.
However, they do not impact the syntax in any way.
Since JSON files can be edited with raw text editors,
you can execute scripts or regular expressions to edit strings more efficiently.
String Editing ( BlangParser )
The entire BLANG file will be modified, which means it will be incompatible with other string mods.
- Extract the contents of BlangEditorv#.#.zip
- Open BlangEditor.exe you should be prompted with the following:

- You may edit any string Identifier or Text you wish.
- Upon highlighting a string line, you may select the DELETE key to remove it.
- To add a string, scroll down to the bottom of the list and add your own Identifiers and Text lines.
- After modifying the strings go to File -> Save As... -> Give it the same name as its original BLANG file.
(ex: english.blang) - Create the following folder directories in your DOOMEternal\Mods folder:
gameresources_patch1\strings
- Copy your modified BLANG file into the strings folder.
- Run the EternalModInjector like normal.
It is not recommended to delete existing string lines because DOOM Eternal will fail to recognize them.
String Customization
Strings can be customized to help specific characters stand out.
String customization applies to both BLANG files and idGuiEntity_Text entities.
Available Colors
Start with ^ then a character from the list below, then end with ^7
Ex: "^5sample text^7" (without quotations) This will make the text teal.
^a - Gold
^b - Light Blue
^c - Green Yellow
^d - Orange
^z - White
^0 - Black
^1 - Red
^2 - Green
^3 - Yellow
^4 - Blue
^5 - Teal
^6 - Purple
^7 - White
^8 - Gray
^9 - Black
In general, helpful tips are colored teal, dangerous threats are colored red.
Spacing
\n - New Line
\t - Tab
Examples
^2Green Yellow^7 -> Green Yellow
^1Red^7 ^aGold^7 -> Red Gold
^1R^7^da^7^3i^7^2n^7^5b^7^bo^7^6w^7 -> Rainbow
This is a ^5sample^7 tip -> This is a sample tip
First line\nSecond line -> First line
Second line
Sample\tText -> Sample Text
Up to 9 separate color identifiers can be present in one string line.
Any additional colorization will cause some to be ignored.
See Also
String File Extensions
These are the string file types you will be interacting with.
.blang
String files that CANNOT be read by a raw text editor.
BLANG files CAN be re-injected into DOOM Eternal.
Example:english.blang
.json
Extracted string files that CAN be read by a raw text editor.
JSON files CANNOT be re-injected into DOOM Eternal.
Example:english.json
Model Modding
Information on how to use custom models in the game.
Importing Custom Models
Required Tools:
Doom Eternal Model Importer by SamPT - Download
Converts .OBJ format models into the .LWO format used by DOOM Eternal.
Blender - Download
Open-source 3D modeling software.
Blender is highly recommended, but other 3D-modeling software may also work.
How to Import Custom Models:
First, download the "Doom Eternal Model Importer" tool and run it. You will see a screen like this: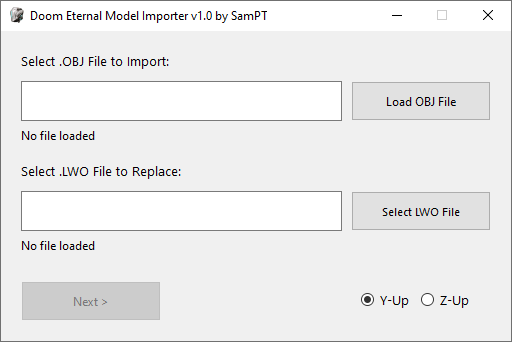
Follow these steps:
1. Click "Load OBJ File" and select the .obj file you want to import.
2. Click "Select LWO File" and select the .lwo file you want to replace - this opens a 2nd window which is similar to SAMUEL, so you can browse the game .resources.
3. Click the "next" button and you'll see a screen like this:

4. Select the material2 .decl you want to use for this model (sometimes there will only be one option). Make a note of the file you picked, because this controls which textures will be loaded for the model.
5. Click "Import Model" - this will convert your .obj file to the .lwo format. Your new .lwo model will be saved to a folder called imports, this will be in the same directory as the model importer tool:

6. Open the imports folder and look for a folder named after the model you replaced (along with some numbers). In this example, the file we replaced was called vial.lwo, so the imported model was saved in a folder called vial_id#15109803643372197552.
7. Open that folder (e.g. vial_id#15109803643372197552) and you'll see two more folders inside. One will be called streamdb and the other will be the name of a ".resources" archive, such as gameresources.

8. Copy and paste both of these folders directly into your Doom Eternal mods folder. (If distributing the mod, you should put them in a .zip file first). This folder contains everything you need to see the model replaced in the game.
9. Run EternalModInjector.bat and you should see the new model in the game.
Important: Custom models will not work with outdated versions of EternalModInjector. To avoid problems, you should add the EternalMod.json file to your completed mod, and set the minimum required version to 19. This will display a warning if someone tries to use your mod with outdated tools.
General Tips / Advice:
- Remember, the model is just the "shape" of the item. In most cases you will also need to replace textures. This isn't handled by the model importer tool. You would do this the same way you'd normally create a texture mod. See the Texture Modding guide for more information.
- If your imported model is facing sideways in the game, try changing the Y-up / Z-up setting on the first screen of Doom Eternal Model Importer.
- If the model you import is too large or small, you need to edit the model with a 3d modeling tool such as Blender. Use this tool to scale your model to the proper size before importing it into the game. (To get an idea of the correct size, you can export a "vanilla" model from the game with SAMUEL, and open that model in Blender, alongside your new one. This will give you a good size comparison).
- When exporting to .obj format from Blender, you should make sure these settings are checked (at minimum):


Note: The current version of the model importer only supports static models (.lwo format). Animated models (.md6mesh format) are not supported yet, so it is not possible to replace things like weapons or enemy models directly. However, you can attach static .lwo models to .md6mesh models to achieve a similar effect. See here: Attaching Static Models to Animated Models
See Also:
- Attaching Static Models to Animated Models
- How to use the "EternalMod.json" file
- Texture Modding guide
Attaching Static Models to Animated Models
Hiding Animated Models:
Find material2 decls for what parts of a model to hide. Replace everything in the decl with the following.
{
	inherit = "template/editor/worldeditor";
	edit = {
		Parms = {
			texturemap = {
				filePath = "art/tile/common/nodraw.tga";
				options = {
					type = "TT_2D";
					filter = "TF_DEFAULT";
					repeat = "TR_REPEAT";
					format = "FMT_RGBA8";
					atlasPadding = 0;
					fullScaleBias = false;
					noMips = false;
					fftBloom = false;
				}
			}
		}
		EditorData = {
			editorImagePath = "art/tile/common/nodraw.tga";
		}
	}
}
This decl can be found in various .resources files at art/tile/common/nodraw.decl. It makes the textures assigned to it unable to see in game.
Attaching Static Models:
It is important to make sure your custom model replaces an existing model that doesn't interfere with gameplay and hasn't been used in a different mod before. Using various mods together that replace the same model for different uses can cause several problems.
When publishing a mod that replaces a static model, you should indicate which static model you replaced. This can help diagnose or avoid compatibility issues with other mods.
Find the FX decl used for the certain model. An easy way to find most of them is to check the fxDecl parameter in most entitydef decls.
In the FX decl, add a new item that uses this example as a base:
			item[11] = { // Change the item number when needed
				name = "assault_rifle";
				group = "fire";
				type = "FX_MODEL";
				looping = true;
				originType = "FX_ORG_TRACK_POS";
				rotationType = "FX_ROT_TRACK_AXIS";
				modelParms = {
					staticModel = "art/kit/hub/prop/pizzabox.lwo"; // The model that will be replaced. When changing the filepath, make sure to add any extra parameters in the .lwo extension if necessary
				}
			}
After adding the new item to the FX decl go to the top of the decl and change "num = <number of items>;" by how many items you added.
Optional Parameters:
- renderWithGunFov - Keeps the custom weapon model at the same position as the FOV. This parameter will have to be added in the ModelParms section of the FX item.
renderWithGunFov = true;
- size - Changes the size of the model.
size = 0.165000007;
- offset - Changes where the model is located.
offset = {
	x = 0;
	y = 0;
	z = 0;
}- rotOffsetAngles - Rotates the model.
rotOffsetAngles = {
	yaw = 0;
	pitch = 0;
	roll = 0;
}- tagNames - Moves the model to a specific body part. Most tags can be found in the FX decl.
tagNames = {
	num = 1;
	item[0] = "muzzle";
}- startCondition and stopCondition - Changes the condition of when the model shows and stops. A full list of conditions can be found in the FX CONDITIONALS page.
startCondition = {
	num = 1;
	item[0] = "FX_WEAPON_BEGIN_RAISE";
}
stopCondition = {
	num = 2;
	item[0] = "FX_WEAPON_BEGIN_LOWER";
	item[1] = "FX_WEAPON_BEGIN_RAISE";
}
Adding Rain FX:
Find the material2 decl for the weapon model you replaced earlier and add the following to the first line of the decl.
inherit = "template/pbr_gun";
Next, you'll have to add the following to the Parms section of the decl.
wetnessdroptiling = 4;
Your material2 decl should look something like this.
{
	inherit = "template/pbr_gun";
	edit = {
		RenderLayers = {
			item[0] = {
				parms = {
					bloommaskmap = {
						options = {
							format = "FMT_BC4";
						}
					}
					colormask = {
						filePath = "textures/system/constant_color/black_noalpha.tga";
						options = {
							type = "TT_2D";
							filter = "TF_DEFAULT";
							repeat = "TR_REPEAT";
							format = "FMT_BC1";
							atlasPadding = 0;
							fullScaleBias = false;
							noMips = false;
							fftBloom = false;
						}
					}
					smoothness = {
						filePath = "textures/system/constant_color/grey_dk.tga";
					}
					normal = {
						filePath = "art/kit/hub/prop/pizzabox_n.tga";
					}
					specular = {
						filePath = "textures/system/specular/flatspec_35.tga";
					}
					albedo = {
						filePath = "art/kit/hub/prop/pizzabox.tga";
					}
				}
			}
		}
		Parms = {
			wetnessdroptiling = 4;
			surfaceemissivecolor = {
				y = 0.690196097;
				z = 0.160784304;
			}
			blendheightmapscale = 4;
		}
	}
}