The assetsinfo JSON format allows for advanced control over mod injector behavior.
**The most common uses of assetsinfo JSON include:** - Adding brand new textures or .decl files to the game (instead of just replacing another file) - Controlling which of the game's .resources and .streamdb archives are loaded in a map (this allows modders to use assets that aren't normally loaded in the level/map they're working with). ## Format Overview ```C# { // experimental - used to add new map layers "layers":[ { "name":"" } ], // experimental - used to add new maps "maps":[ { "name":"" } ], // used for adding, removing, or re-ordering of .resources files "resources":[ { "name":"", "remove":, "placeFirst":, "placeBefore":, "placeByName":"" } ], // used for adding, removing, or re-ordering of game assets "assets":[ { "name":"", "mapResourceType":"", "resourceType":"", "streamDbHash":, "version":, "remove":, "placeBefore":, "placeByName":"", "placeByType":"", "specialByte1":, "specialByte2":, "specialByte3": } ] } ``` ## "Layers" array The first part of the assetsinfo JSON format is the **`layers`** array. This can be used to add additional layers to a map, which can then be referenced via .entities. Each item in this array contains an object that has the **`name`** property. This field is required for each entry. In there you can set the name of the layer you want to create. It's that simple. Here is an example usage that adds three custom layers: ```INI { "layers":[ { "name":"game/sp/custom/my_custom_layer" }, { "name":"game/sp/custom/my_custom_layer_2" }, { "name":"game/sp/custom/my_custom_layer_3" } ] } ```**Note:** It is unclear what effect this has on gameplay, since it is possible to add new layers to the game without this step, and all existing layers in the game can already be used in any level without additional steps anyway.
## "Maps" array The second part of the assetsinfo JSON format is the **`maps`** array. As with th**e `layers`** array, each item contains an object that has the `name` property. In there you can set the name of the map you want to create. This feature is currently of limited use, since we can't create new maps anyway. Here is an example usage that adds two custom maps: ```INI { "maps":[ { "name":"maps/game/sp/custom/my_custom_map" }, { "name":"maps/game/sp/custom/my_custom_map_2" } ] } ``` ## "Resources" array The third part of the assetsinfo JSON format is the `resources` array. This one is a bit more complicated, so let's begin by explaining what this is actually for. In DOOM Eternal, each map has a list of **.resources** and **.streamdb** files that will be loaded in the map itself. With this feature, you can tell the game to load additional .resources and/or .streamdb files in maps. In other words, **you can load files that aren't normally loaded**, giving you access to game assets and entities that normally aren't available. You can also tell the game to stop loading .resources or .streamdb files that are loaded by default in maps.This feature is what allows us to load things like spirits and other DLC-specific enemies into the base campaign.
Below is an example usage. This would add the `e5m1_spear.resources` file, as well as several .streamdb files, to a map that it is not normally loaded in. Don't worry if you don't understand this - it is explained in more detail on the [**Reference: "resources" array** ](https://wiki.eternalmods.com/books/eternalmod-json-guide/page/reference-resources-array "Reference: "resources" Array")page of the guide**.** ```INI { "resources":[ { "name":"e5m1_spear.resources" }, { "name":"gameresources_6_1.streamdb", "placeBefore":true, "placeByName":"gameresources_0_4.streamdb" }, { "name":"gameresources_0_6.streamdb", "placeBefore":true, "placeByName":"gameresources_0_4.streamdb" }, { "name":"gameresources_1_8.streamdb", "placeBefore":true, "placeByName":"gameresources_0_4.streamdb" }, { "name":"gameresources_2_2.streamdb", "placeBefore":true, "placeByName":"gameresources_0_4.streamdb" }, { "name":"gameresources_3_2.streamdb", "placeBefore":true, "placeByName":"gameresources_0_4.streamdb" }, { "name":"gameresources_4_3.streamdb", "placeBefore":true, "placeByName":"gameresources_0_4.streamdb" }, { "name":"gameresources_5_3.streamdb", "placeBefore":true, "placeByName":"gameresources_0_4.streamdb" } ] } ``` ## "Assets" array The last feature in the assetsinfo JSON is the `assets` array. This is the most complicated one to understand as it has a lot of fields. In most cases, you will only need to use a few of them. The main purpose of this section is to add entirely new assets to the game. (Most mods work by replacing another asset that already exists, rather than adding something new). For more details, refer to the [**Reference: "assets" array** ](https://wiki.eternalmods.com/books/eternalmod-json-guide/page/reference-assets-array "Reference: "assets" Array")page of the guide**.** An example usage is below. This would add a new image file to the game: ```INI { "assets":[ { "resourceType":"image", "version":21, "name":"custom_textures/custom_emissive_texture.tga$bc1$streamed$mtlkind=bloommask", "mapResourceType":"image" } ] } ``` ## See Also - [Reference: "resources" Array](https://wiki.eternalmods.com/books/eternalmod-json-guide/page/reference-resources-array "Reference: "resources" Array") # Reference: "resources" ArrayIn DOOM Eternal, each map has a list of *.resources* and *.streamdb* files that will be loaded in the map itself. With this feature, you can tell the game to load other *.resources* and/or *.streamdb* files in maps. You can also tell the game to stop loading *.resources* or *.streamdb* files that are loaded by default in maps.
## Structure The basic structure of the "resources" array is below: ```INI { "resources":[ { "name":"", "remove":, "placeFirst":, "placeBefore":, "placeByName":"" } ] } ``` - **`name`** (string) (required) - the name of the file to load, e.g. `"e5m1_spear.resources"` - `remove` (bool) (optional) - if set to `true`, the file specified by the **`name`** property will be removed from the map. Defaults to `false` if not set. - `placeFirst` (bool) (optional) - if set to `true`, the file specified by the **`name`** property will be loaded with the highest priority in the map. Defaults to `false` if not set. - `placeBefore` (bool) (optional) - if set to `true`, this resource will be loaded before the resource named in the `placeByName` property. Defaults to `false` if not set (meaning it will be loaded after). - `placeByName` (string) (optional) - used with `placeBefore` to control the order in which resource files are loaded. For example, setting `"placeBefore":true` and `"placeByName":"e1m1_intro.resources"` will cause the file specified by `name` to be loaded with a higher priority than e1m1\_intro.resources.If neither `placeBefore` nor **`placeByName`** are set, then the asset will be loaded last, with the lowest priority.
## Example Usage The most common use of this feature is to give custom map/level creators access to assets that aren't normally available in a map. For example, you can tell the game to load **e5m1\_spear.resources** (and the required .streamdb files) within another level, such as e1m1\_intro. By doing this, a person modifying the e1m1\_intro map can then freely access files/entities from e5m1\_spear.resources, the same as if they existed in e1m1\_intro already. This would allow you to use DLC AI such as spirits (and many other things) in e1m1\_intro, where they normally can't be used. Below is a sample .json snippet that loads the e5m1\_spear.resources and .streamdb files. ```INI { "resources":[ { "name":"e5m1_spear.resources" }, { "name":"gameresources_6_1.streamdb", "placeBefore":true, "placeByName":"gameresources_0_4.streamdb" }, { "name":"gameresources_0_6.streamdb", "placeBefore":true, "placeByName":"gameresources_0_4.streamdb" }, { "name":"gameresources_1_8.streamdb", "placeBefore":true, "placeByName":"gameresources_0_4.streamdb" }, { "name":"gameresources_2_2.streamdb", "placeBefore":true, "placeByName":"gameresources_0_4.streamdb" }, { "name":"gameresources_3_2.streamdb", "placeBefore":true, "placeByName":"gameresources_0_4.streamdb" }, { "name":"gameresources_4_3.streamdb", "placeBefore":true, "placeByName":"gameresources_0_4.streamdb" }, { "name":"gameresources_5_3.streamdb", "placeBefore":true, "placeByName":"gameresources_0_4.streamdb" } ] } ``` ## How Do I Know Which Files to Add? First, take a look at this spreadsheet (note: there are multiple tabs at the bottom): [https://docs.google.com/spreadsheets/d/10R5fWKGyqPuCPdueqKeCYycHETSHg0QeFOCbWIQZUCY/](https://docs.google.com/spreadsheets/d/10R5fWKGyqPuCPdueqKeCYycHETSHg0QeFOCbWIQZUCY/edit#gid=179806618 "https://docs.google.com/spreadsheets/d/10R5fWKGyqPuCPdueqKeCYycHETSHg0QeFOCbWIQZUCY/edit#gid=179806618") This spreadsheet contains the list of the default *.resources* and *.streamdb* files that are loaded in all the game's maps. So, let's say that we want to have access to all the assets in **e5m1\_spear.resources** in **e1m1\_intro.resources**. The first thing we need to do is find the "e5m1\_spear" map name in the spreadsheet, using the "map name" column. You will see that the map name appears multiple times. This is because the map loads multiple .resources and .streamdb files. In the "file name" column you will see the names of the files that are loaded in the map. The order of the files matters. It actually goes from bottom to up, so the files at the bottom are loaded first during the map loading process, and the files at the top are loaded last. This means that the files at the top override the others (if they share files in common). This is what we refer to as **load priority**. # EternalMod JSONThis .json file allows mod makers to define information about their mods, such as mod name, author(s), description and version number.
This feature is only available for zipped mods. You can not place an EternalMod JSON file at the root of your *~/Mods/* directory; it will be ignored.
### How to Use: Using the EternalMod.json file is simple: 1. Create a file named **"EternalMod.json"** 2. Place the `EternalMod.json` file at the root of your zipped mod, outside of the container folders. **Example:** `~/Mods/My_Amazing_Mod.zip/EternalMod.json` 3. Use a text editor such as Notepad++ to edit the file as needed. ### Format: This is the format of this JSON file (all fields are optional): ``` { "name":"", "author":"", "description":"", "version":"", "loadPriority":, "requiredVersion": } ``` - **name**: *(string)* The name of your mod. - **author**: *(string)* The author(s) of the mod. - **description**: *(string)* Description of what your mod does. - **version**: *(string)* The version number of your mod. - **loadPriority**: *(integer)* This field determines the load priority of your mod. The lower the number, the higher is the priority. Mods with higher priorities will be loaded last during the mod loading process. For example, a mod with load priority `-5` will be loaded *after* another mod with priority `5`). If the load priority is not specified, it will be `0` by default. Unzipped (loose) mods will always be loaded last. - **requiredVersion**: *(integer)* The minimum mod loader version that is required to install your mod. Normally, you should set this to the current mod loader version number. In order to check the version number the current mod loader, you can run it with the '--version' option: `DEternal_loadMods.exe --version` ### Example File: Here's an example of an **EternalMod.json** file with all the fields filled in: ``` { "name":"Enemy Randomizer", "author":"proteh", "description":"This mod randomizes every enemy encounter in the base game and the DLCs.", "version":"3.0", "loadPriority":100, "requiredVersion":6 } ``` # Legacy String Modding # Extracting StringsSee [Extracting Resources](https://wiki.eternalmods.com/books/beginners-guide-how-to-create-mods/page/extracting-resources) before proceeding. You must have **gameresources.resources** extracted.
A [string](https://en.wikipedia.org/wiki/String_(computer_science)) is a sequence of characters (text) that appears literally.
### Extracting Tools **BlangJsonGeneratorUI by PowerBall253 - [Download](https://github.com/PowerBall253/BlangJsonGeneratorUI/releases)** Modifies BLANG files and exports the changes as JSON. **BlangJsonGenerator by PowerBall253 - [Download](https://github.com/PowerBall253/BlangJsonGenerator/releases)** Exports BLANG files into JSON, a format that can be edited with raw text editor, such as [Notepad++](https://notepad-plus-plus.org/). **BlangParser by proteh - [Download](https://github.com/dcealopez/BlangParser)** Directly modifies BLANG files with a simple GUI.Currently, there are no released packages for BlangParser. You will either need to find a compiled version in the 2016+ Modding Discord server or compile it with a C# compiler.
Each BLANG file usually range from 1.5 MB to 2 MB of storage.
### Finding BLANG files - As of Update 6.66 - Rev 1.1, the highest-priority string files are located in **gameresources\_patch1\\strings** from your resource output directory. - Copy any language BLANG file of choice and paste is somewhere safe. This will be the string file that you will modify. ### Extraction Instructions ( BlangJsonGenerator )It is **recommended** to create a folder containing both "**BlangJsonGenerator.exe**" and the unmodified **BLANG** file.
- Run "**BlangJsonGenerator.exe**". - Select option **1**. - Input the name of the **.blang** file. ( ex: **english.blang** ) - Input the language name. ( ex: **english** ) - Input the name of the output file. ( ex: **english.json** ) - Close the executable. - You may now edit each string value. See [Creating String Mods](https://wiki.eternalmods.com/books/beginners-guide-how-to-create-mods/page/creating-string-mods) for more information.The output folder **must** end with **.json**
### List of Resources| **Resource Name** | **Information** |
| english.blang | Contains strings for the English language |
| french.blang | Contains strings for the French language |
| german.blang | Contains strings for the German language |
| italian.blang | Contains strings for the Italian language |
| japanese.blang | Contains strings for the Japanese language |
| latin\_spanish.blang | Contains strings for the Latin American Spanish language |
| polish.blang | Contains strings for the Polish language |
| portuguese.blang | Contains strings for the Portuguese language |
| russian.blang | Contains strings for the Russian language |
| simplified\_chinese.blang | Contains strings for the Simplified Chinese language |
| spanish.blang | Contains strings for the European Spanish language |
| traditional\_chinese.blang | Contains strings for the Traditional Chinese language |
See [Extracting Strings](https://wiki.eternalmods.com/books/beginners-guide-how-to-create-mods/page/extracting-strings) before proceeding.
Make sure to backup the unmodified **BLANG** file.
Strings can be added to **BLANG** files, but you must reference them with **decls** files.
### String Editing ( BlangJsonGeneratorUI ) - Extract the contents of **BlangJsonGenerator-\*.zip**. - Open **BlangJsonGenerator.exe**, then go to **File** -> **Open blang** **file...** to edit an existing BLANG file, or to **File** -> **Open blang from .resources file** to edit a BLANG file contained in a .resources file. You can also go to **File** -> **New...** to create a new BLANG JSON mod from scratch. - You should now see something like this: [](https://wiki.eternalmods.com/uploads/images/gallery/2022-03/screenshot.png) - You may edit any string **Identifier** or **Text** you wish. - To add a string, use the **+** button in the top-right corner. - After modifying the strings go to **File** -> **Save...** -> Give it the same name as its original BLANG file, with the extension changed to JSON. (ex: **english.json**). - Create the following folder directories in your **DOOMEternal\\Mods** folder: **gameresources\_patch1\\EternalMod\\strings** - Copy your **modified** JSON file into the strings folder. - Run the **EternalModInjector** like normal. ### String Editing ( BlangJsonGenerator )Any unused string can be **deleted**, so it can be **compatible** with other mods that affect other strings.
- Create a backup for the string JSON file. - Open the string JSON file. ( ex: **english.json** ) - The strings should be formatted like this: [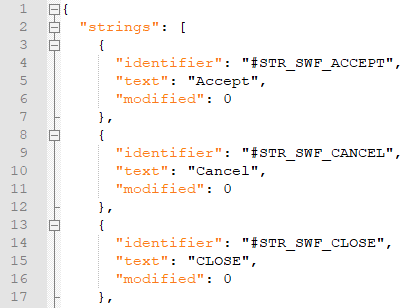](https://wiki.eternalmods.com/uploads/images/gallery/2021-09/image-1631218573399.png) - If they are not, see the [Extracting Strings](https://wiki.eternalmods.com/books/beginners-guide-how-to-create-mods/page/extracting-strings) page, under **Extraction Instructions: ( BlangJsonGenerator )** - Go to the Replace tab (CTRL + F) -> Replace -> Search Mode: Check **Regular expression** - Input the following and select **Replace All** for each: [1) 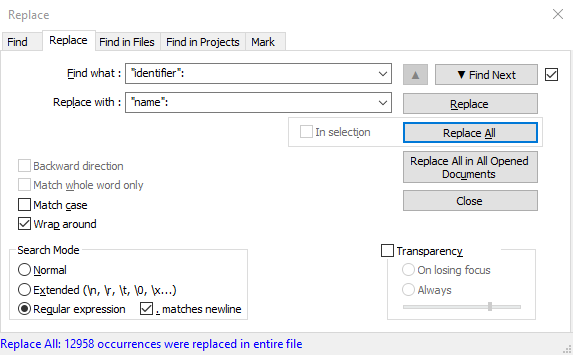](https://wiki.eternalmods.com/uploads/images/gallery/2021-09/image-1631217604007.PNG) **"identifier":** **"name":**The "**Replace with :** " box is empty for screenshot 2.
[2) ](https://wiki.eternalmods.com/uploads/images/gallery/2021-09/image-1631217614687.PNG) **"modified": 0**The "**Replace with :** " box is empty for screenshot 3.
[3) ](https://wiki.eternalmods.com/uploads/images/gallery/2021-09/image-1631217622425.PNG) **^(?:\[\\t \]\*(?:\\r?\\n|\\r))+** - The results should be formatted like this: [](https://wiki.eternalmods.com/uploads/images/gallery/2021-09/image-1631218052834.png) - The JSON file is now in a format that can be properly re-injected into DOOM Eternal. Save a backup of this JSON file as well, so you would not need to go through this process again (before the next DOOM Eternal update). - Find the strings that you wish to modify. (CTRL + F) - After modifying the strings of your choice, delete all other **unmodified** strings. - Save your **modified** JSON file with the same name as it was exported. ( ex: **english.json** ) - Create the following folder directories in your **DOOMEternal\\Mods** folder: **gameresources\_patch1\\EternalMod\\strings** - Copy your **modified** JSON file into the strings folder. - Run the **EternalModInjector** like normal.The commas "," at the end of each string name and text are unnecessary and can be deleted. However, they do not impact the syntax in any way.
Since JSON files can be edited with raw text editors, you can execute scripts or [regular expressions](https://en.wikipedia.org/wiki/Regular_expression) to edit strings more efficiently.
### String Editing ( BlangParser )The entire **BLANG** file will be modified, which means it will be **incompatible** with other string mods.
- Extract the contents of **BlangEditorv#.#.zip** - Open **BlangEditor.exe** you should be prompted with the following: [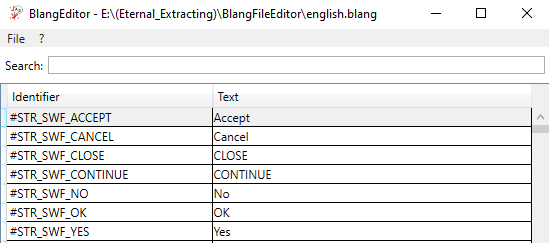](https://wiki.eternalmods.com/uploads/images/gallery/2021-09/image-1631220049230.PNG) - You may edit any string **Identifier** or **Text** you wish. - Upon highlighting a string line, you may select the **DELETE** key to remove it. - To add a string, scroll down to the bottom of the list and add your own **Identifiers** and **Text** lines. - After modifying the strings go to **File** -> **Save As...** -> Give it the same name as its original BLANG file. (ex: **english.blang**) - Create the following folder directories in your **DOOMEternal\\Mods** folder: **gameresources\_patch1\\strings** - Copy your **modified** BLANG file into the strings folder. - Run the **EternalModInjector** like normal.It is not recommended to delete existing string lines because DOOM Eternal will fail to recognize them.
# String File ExtensionsThese are the string file types you will be interacting with.
##### .blang String files that **CANNOT** be read by a raw text editor. BLANG files **CAN** be re-injected into DOOM Eternal. Example: **`english.blang`** ##### .json Extracted string files that **CAN** be read by a raw text editor. JSON files **CANNOT** be re-injected into DOOM Eternal. Example: **`english.json`**