Eternal - Visual Modding
Information for people who are looking to create FX, Texture, Model, String, and Video mods.
- Visual FX
- Texture Modding
- Beginner's Guide
- Intermediate Guide: Material2 & Custom Normals
- Advanced Guide: Advanced Customization & New Texture Creation
- Getting Started in Substance Painter
- Model Modding
- String Modding
- Video Modding
Visual FX
Information about various visual effects, such as FX, Particles, and Ribbons.
OVERVIEW
- An fx decl is found inside
generated/decls/fx/ - each fx decl is made of
nelements - each element can be the following type
- FX_PARTICLE
- bread and butter of all FX you'll encounter, it calls on a particle decl that contains particlestage elements or custom elements defined to that particular particle decl
- FX_LIGHT
- FX_DECAL
- spawns 3d models such as rocks, smoke, or other simple shapes
- FX_MODEL
- used for things like the tyrant and baron sword effects
- FX_SOUND
- FX_SCREEN_SHAKE
- FX_CONTROLLER_SHAKE
- FX_RENDERPARM
- effects such as the khan/blood maykr and doomhunter shields
- FX_BLENDED_OPACITY
- FX_ENV_OVERRIDE
- FX_FLARE
- FX_BLUR_RADIAL
- FX_BLUR_GAUSSIAN
- FX_DEPTH_OF_FIELD
- FX_FOV
- FX_RIBBON_2
- FX_HURT_TRIGGER
- FX_DESTRUCTIBLE
- FX_SCREEN_FLASH
- FX_SCREEN_OVERLAY
- FX_SCREEN_OVERLAY_ANIMATED_MASK
- FX_SCREEN_DISTORTION
- FX_SCREEN_VIGNETTE
- FX_LIGHT_SCATTERING_VOLUME
- useful for smoke bomb effects that are computationally cheap to create
- FX_PARTICLE
FX_PARTICLE
The most common type of FX element will be an FX_PARTICLE, this called on a particle decl file that either defines the particle in the file itself or references already defined particleStage files.
Here are the most essential things to know when dealing with particle decls.
1.) Assign one or many particle decls to an FX element.
A single particle decl.
// each time the FX element is invoked, the sole declPrt will be rendered
item[8] = {
	name = "shrapnel_CENTER";
	group = "explosion";
	type = "FX_PARTICLE";
	duration = 2000;
	fadeOutTime = 1500;
	fadeInTime = 0;
	size = 2.0;
	enabled = true;
	delayMin = 100;
	delayMax = 115;
	color = {
		r = 1.0;
		g = 0.4;
		b = 0.2;
		a = 1.0;
	}
	tagNames = {
		num = 1;
		item[0] = "exhaust";
	}
	multiTagUseType = "FX_MULTI_TAG_USE_ALL";
	startCondition = {
		num = 1;
		item[0] = "FX_PROJECTILE_EXPLODE_ALT";
	}
	stopCondition = {
		num = 1;
		item[0] = "FX_OUTLINE_OFF";
	}
	originType = "FX_ORG_TRACK_POS";
	offset = {
		x = 0.0;
		y = 0.0;
		z = 0.0;
	}
	rotationType = "FX_ROT_START_AXIS_PARENT";
	rotOffsetAngles = {
		pitch = 0;
		yaw = 0;
		roll = 0;
	}
	particleParms = {
		declPrt = "weapons/rocketlauncher/explosion_lockon";
	}
}
If you pass an FX element a list of particle decls, one of them will be chosen at random each time the element is invoked. This is very useful if you don't want to see the same explosions over and over.
item[6] = {
	name = "LockonRocketExplosion";
	group = "explosion";
	type = "FX_PARTICLE";
	duration = 1500;
	fadeInTime = 0;
	fadeOutTime = 1000;
	size = 1.0;
	enabled = false;
	color = {
		y = 0.130136997;
		z = 0.0262412;
	}
	multiTagUseType = "FX_MULTI_TAG_USE_ALL";
	startCondition = {
		num = 4;
		item[0] = "FX_PROJECTILE_EXPLODE";
		item[1] = "FX_PROJECTILE_STOP";
		item[2] = "FX_PROJECTILE_STUCK";
		item[3] = "FX_PROJECTILE_EXPLODE_ALT";
	}
	stopCondition = {
		num = 1;
		item[0] = "FX_NONE";
	}
	particleParms = {
		declPrtList = {
			num = 3;
			item[0] = "weapons/combatshotgun/pop_rocket_charge_lv_01";
			item[1] = "character/pain_elemental/lost_soul/explosion";
			item[2] = "character/zombie_cueball/full_body_explosion";
			// declPrt = "weapons/grenade_launcher/concussive_blast";
			// declPrt = "weapons/rocketlauncher/explosion_array";

		}
	}
}
Using declPrtList makes it convenient to switch out particle decls, just don't forget to comment out the extra indexes!
particleParms = {
	declPrtList = {
		num = 3;
		item[0] = "weapons/combatshotgun/pop_rocket_charge_lv_01";
        item[0] = "character/doom_hunter/destructables/metal_chunk_explosion";
		item[1] = "character/pain_elemental/lost_soul/explosion";
		item[2] = "character/zombie_cueball/full_body_explosion";
	}
}
FX CONDITIONALS
FX_NONE
FX_EXPLOSIVE_ARMED
FX_EXPLOSIVE_UNARMED
FX_VEH_START_BOOST
FX_VEH_STOP_BOOST
FX_VEH_START_BOOST2
FX_VEH_STOP_BOOST2
FX_VEH_START_BOOST3
FX_VEH_STOP_BOOST3
FX_VEH_START_PUSH
FX_VEH_STOP_PUSH
FX_VEH_START_MONSTERBASHER
FX_VEH_STOP_MONSTERBASHER
FX_CAPTURE_SKULL
FX_START_DAMAGE_LEVEL_1
FX_STOP_DAMAGE_LEVEL_1
FX_START_DAMAGE_LEVEL_2
FX_STOP_DAMAGE_LEVEL_2
FX_START_DAMAGE_LEVEL_3
FX_STOP_DAMAGE_LEVEL_3
FX_START_DAMAGE_LEVEL_4
FX_STOP_DAMAGE_LEVEL_4
FX_EXTRA_DAMAGE
FX_PAIN_INTERUPT
FX_PAIN_INTERRUPT_END
FX_WEAPON_FIREMODE_PRIMARY
FX_WEAPON_FIREMODE_SECONDARY
FX_WEAPON_TRIGGER_PULL
FX_WEAPON_TRIGGER_RELEASE
FX_WEAPON_START_FIRE
FX_WEAPON_START_FIRE_CHARGED
FX_WEAPON_START_FIRE_LEFT
FX_WEAPON_START_FIRE_RIGHT
FX_WEAPON_START_FIRE_LEFT_ALT
FX_WEAPON_START_FIRE_RIGHT_ALT
FX_WEAPON_START_FIRE_LEFT_DAMAGED
FX_WEAPON_START_FIRE_RIGHT_DAMAGED
FX_WEAPON_START_THIRD_PERSON_FIRE
FX_WEAPON_START_FIRE_QUAD
FX_WEAPON_START_FIRE_QUAD_LEFT
FX_WEAPON_STOP_FIRE
FX_WEAPON_STOP_FIRE_LEFT
FX_WEAPON_STOP_FIRE_RIGHT
FX_WEAPON_STOP_FIRE_LEFT_ALT
FX_WEAPON_STOP_FIRE_RIGHT_ALT
FX_WEAPON_STOP_FIRE_LEFT_DAMAGED
FX_WEAPON_STOP_FIRE_RIGHT_DAMAGED
FX_WEAPON_START_RIBBON
FX_WEAPON_STOP_RIBBON
FX_WEAPON_FIRE_HIT
FX_WEAPON_FIRE_MISS
FX_WEAPON_START_SHELL_EJECT
FX_WEAPON_DRYFIRE
FX_WEAPON_BEGIN_RAISE
FX_WEAPON_BEGIN_LOWER
FX_WEAPON_RELOAD
FX_WEAPON_UNLOAD_AMMO
FX_WEAPON_CHAMBER_AMMO
FX_WEAPON_HAS_AMMO
FX_WEAPON_LOW_AMMO
FX_WEAPON_NO_AMMO
FX_WEAPON_BURST_FIRE_1
FX_WEAPON_BURST_FIRE_2
FX_WEAPON_BURST_FIRE_3
FX_WEAPON_BURST_FIRE_4
FX_WEAPON_BURST_FIRE_5
FX_WEAPON_BURST_FIRE_6
FX_WEAPON_BURST_FIRE_7
FX_WEAPON_BURST_FIRE_8
FX_WEAPON_BURST_FIRE_9
FX_WEAPON_BURST_FIRE_10
FX_WEAPON_BURST_FIRE_11
FX_WEAPON_BURST_FIRE_12
FX_WEAPON_START_ZOOM
FX_WEAPON_END_ZOOM
FX_WEAPON_CHARGE_READY
FX_WEAPON_CHARGE_START
FX_WEAPON_CHARGE_STOP
FX_WEAPON_CHARGE_FULL
FX_WEAPON_CHARGE_FULL_ONCE
FX_WEAPON_CHARGE_PARM
FX_WEAPON_CHARGE_CHARGING
FX_WEAPON_CHARGE_ITEM_VALUE_INT
FX_WEAPON_CHARGE_ITEM_VALUE_0
FX_WEAPON_CHARGE_ITEM_VALUE_1
FX_WEAPON_CHARGE_ITEM_VALUE_2
FX_WEAPON_CHARGE_ITEM_VALUE_3
FX_WEAPON_CHARGE_ITEM_VALUE_4
FX_WEAPON_CHARGE_ITEM_VALUE_5
FX_WEAPON_CHARGE_ITEM_VALUE_6
FX_WEAPON_CHARGE_ITEM_VALUE_7
FX_WEAPON_CHARGE_ITEM_VALUE_8
FX_WEAPON_CHARGE_ITEM_VALUE_9
FX_WEAPON_CHARGE_ITEM_VALUE_10
FX_WEAPON_CHARGE_ITEM_VALUE_11
FX_WEAPON_CHARGE_ITEM_VALUE_12
FX_WEAPON_CHARGE_FULL_ITEM_VALUE_0
FX_WEAPON_CHARGE_FULL_ITEM_VALUE_1
FX_WEAPON_CHARGE_FULL_ITEM_VALUE_2
FX_WEAPON_CHARGE_FULL_ITEM_VALUE_3
FX_WEAPON_CHARGE_FULL_ITEM_VALUE_4
FX_WEAPON_CHARGE_FULL_ITEM_VALUE_5
FX_WEAPON_CHARGE_FULL_ITEM_VALUE_6
FX_WEAPON_CHARGE_FULL_ITEM_VALUE_7
FX_WEAPON_CHARGE_FULL_ITEM_VALUE_8
FX_WEAPON_CHARGE_FULL_ITEM_VALUE_9
FX_WEAPON_CHARGE_FULL_ITEM_VALUE_10
FX_WEAPON_CHARGE_FULL_ITEM_VALUE_11
FX_WEAPON_CHARGE_FULL_ITEM_VALUE_12
FX_WEAPON_CHARGE_PERCENT_0
FX_WEAPON_CHARGE_PERCENT_10
FX_WEAPON_CHARGE_PERCENT_20
FX_WEAPON_CHARGE_PERCENT_30
FX_WEAPON_CHARGE_PERCENT_40
FX_WEAPON_CHARGE_PERCENT_50
FX_WEAPON_CHARGE_PERCENT_60
FX_WEAPON_CHARGE_PERCENT_70
FX_WEAPON_CHARGE_PERCENT_80
FX_WEAPON_CHARGE_PERCENT_90
FX_WEAPON_CHARGE_PERCENT_100
FX_WEAPON_CHARGE_PERCENT_25
FX_WEAPON_CHARGE_PERCENT_75
FX_WEAPON_CHARGE_DISCHARGE
FX_WEAPON_CHARGE_DISCHARGE_FULL
FX_WEAPON_CHARGE_COOLDOWN_PERCENT_0
FX_WEAPON_CHARGE_COOLDOWN_PERCENT_10
FX_WEAPON_CHARGE_COOLDOWN_PERCENT_20
FX_WEAPON_CHARGE_COOLDOWN_PERCENT_30
FX_WEAPON_CHARGE_COOLDOWN_PERCENT_40
FX_WEAPON_CHARGE_COOLDOWN_PERCENT_50
FX_WEAPON_CHARGE_COOLDOWN_PERCENT_60
FX_WEAPON_CHARGE_COOLDOWN_PERCENT_70
FX_WEAPON_CHARGE_COOLDOWN_PERCENT_80
FX_WEAPON_CHARGE_COOLDOWN_PERCENT_90
FX_WEAPON_CHARGE_COOLDOWN_PERCENT_100
FX_WEAPON_CHARGE_COOLDOWN_PERCENT_25
FX_WEAPON_CHARGE_COOLDOWN_PERCENT_75
FX_WEAPON_MOD_ACTIVATE
FX_WEAPON_MOD_DEACTIVATE
FX_WEAPON_MASTERED_BURST_FIRE_REFILL_1
FX_WEAPON_MASTERED_BURST_FIRE_REFILL_2
FX_WEAPON_MASTERED_BURST_FIRE_REFILL_3
FX_WEAPON_MASTERED_BURST_FIRE_REFILL_4
FX_WEAPON_MASTERED_BURST_FIRE_REFILL_5
FX_WEAPON_MASTERED_BURST_FIRE_REFILL_6
FX_WEAPON_MASTERED_BURST_FIRE_REFILL_7
FX_WEAPON_MASTERED_BURST_FIRE_REFILL_8
FX_WEAPON_MASTERED_BURST_FIRE_REFILL_9
FX_WEAPON_MASTERED_BURST_FIRE_EMPTY_1
FX_WEAPON_MASTERED_BURST_FIRE_EMPTY_2
FX_WEAPON_MASTERED_BURST_FIRE_EMPTY_3
FX_WEAPON_MASTERED_BURST_FIRE_EMPTY_4
FX_WEAPON_MASTERED_BURST_FIRE_EMPTY_5
FX_WEAPON_MASTERED_BURST_FIRE_EMPTY_6
FX_WEAPON_MASTERED_BURST_FIRE_EMPTY_7
FX_WEAPON_MASTERED_BURST_FIRE_EMPTY_8
FX_WEAPON_MASTERED_BURST_FIRE_EMPTY_9
FX_WEAPON_BARREL_SPIN
FX_WEAPON_TARGET_ACQUIRING
FX_WEAPON_TARGET_LOCKED
FX_WEAPON_TARGET_LOCK_RELEASED
FX_WEAPON_TARGET_LOCK_BROKEN
FX_WEAPON_NO_MICROWAVE_TARGET
FX_WEAPON_NO_MICROWAVE_TARGET_STOP
FX_WEAPON_WARNING_START
FX_WEAPON_WARNING_STOP
FX_WEAPON_SEARCHING_START
FX_WEAPON_SEARCHING_STOP
FX_WEAPON_MEATHOOK_RETURN
FX_WEAPON_SUPERCHARGE_START
FX_WEAPON_SUPERCHARGE_STOP
FX_HOLOGRAM_START
FX_LASER_ON
FX_LASER_OFF
FX_SAVING_THROW_START
FX_SAVING_THROW_END
FX_BFG_POWER_DOWN
FX_PROJECTILE_LAUNCH
FX_PROJECTILE_TRAIL
FX_PROJECTILE_BREAK
FX_PROJECTILE_STOP
FX_PROJECTILE_STUCK
FX_PROJECTILE_STUCK_WEAK_POINT
FX_PROJECTILE_EXPLODE
FX_PROJECTILE_EXPLODE_LOCAL
FX_PROJECTILE_EXPLODE_ALT
FX_PROJECTILE_EXPLODE_ALT_2
FX_PROJECTILE_EXPLODE_PIECE_1
FX_PROJECTILE_EXPLODE_PIECE_2
FX_PROJECTILE_EXPLODE_PIECE_3
FX_PROJECTILE_EXPLODE_PIECE_4
FX_PROJECTILE_EXPLODE_DEFAULT
FX_PROJECTILE_EXPLODE_BLOOD_POOL
FX_PROJECTILE_EXPLODE_SLUDGE
FX_PROJECTILE_EXPLODE_DIRT
FX_PROJECTILE_EXPLODE_PLASTIC
FX_PROJECTILE_EXPLODE_GLASS
FX_PROJECTILE_EXPLODE_WATER
FX_PROJECTILE_EXPLODE_WOOD
FX_PROJECTILE_EXPLODE_STONE
FX_PROJECTILE_EXPLODE_METAL
FX_PROJECTILE_EXPLODE_AIR
FX_PROJECTILE_EXPLODE_ASPHALT
FX_PROJECTILE_EXPLODE_FROM_DETONATE_SURF
FX_PROJECTILE_EXPLODE_BOSS
FX_PROJECTILE_EXPLODE_WEAK_POINT
FX_PROJECTILE_COLLIDE
FX_PROJECTILE_DEPLOY
FX_PROJECTILE_DIRECT_DAMAGE
FX_PROJECTILE_PROXIMITY_FLARE_START
FX_PROJECTILE_PROXIMITY_FLARE_END
FX_PROJECTILE_ENTER_SOLID
FX_PROJECTILE_EXIT_SOLID
FX_PROJECTILE_AI_FALTER
FX_AI_HEADSHOT
FX_AI_HEADSHOT_BONUS
FX_AI_DMG_BLOOD
FX_AI_DMG_TANK
FX_AI_START_DMG_ELECTROCUTE
FX_AI_STOP_DMG_ELECTROCUTE
FX_AI_IMPALED
FX_AI_BFG_EXPLODE
FX_AI_FREEZE
FX_AI_UNFREEZE
FX_PENETRATING_SHOT
FX_PENETRATING_SHOT_2
FX_PENETRATING_SHOT_3
FX_PENETRATING_SHOT_4
FX_PENETRATING_SHOT_5
FX_PROP_SPAWN
FX_PROP_PICKUP
FX_PROP_USE
FX_PROP_STOP_USE
FX_PROP_ACTIVATE
FX_PROP_BREAK
FX_PROP_EXPLODE
FX_PROP_DAMAGE
FX_ZIPLINE_SPEED_SLOW
FX_ZIPLINE_SPEED_MED
FX_ZIPLINE_SPEED_FAST
FX_ZIPLINE_SPEED_LUDICROUS
FX_ZIPLINE_SPEED_SLOW_REVERSE
FX_ZIPLINE_SPEED_MED_REVERSE
FX_ZIPLINE_SPEED_FAST_REVERSE
FX_ZIPLINE_SPEED_LUDICROUS_REVERSE
FX_START_ON_FIRE
FX_STOP_ON_FIRE
FX_START_DEATH_1
FX_START_DEATH_2
FX_START_DEATH_3
FX_START_DEATH_4
FX_START_DEATH_BFG
FX_START_DEATH_SIGNATURE
FX_START_DEATH_LAVA
FX_START_DEATH_EXPLODE
FX_PARRY_ACTIVE
FX_PARRY_ACTIVE_UPGRADED
FX_PARRY_SUCCESS
FX_PARRY_SUCCESS_UPGRADED
FX_HAZMAT_OFF
FX_HAZMAT_0_25
FX_HAZMAT_26_50
FX_HAZMAT_51_75
FX_HAZMAT_76_100
FX_OXYGEN_OFF
FX_OXYGEN_0_25
FX_OXYGEN_26_50
FX_OXYGEN_51_75
FX_OXYGEN_76_100
FX_MODEL_SHOW_01
FX_MODEL_SHOW_02
FX_MODEL_SHOW_03
FX_MODEL_SHOW_04
FX_MODEL_SHOW_05
FX_MODEL_SHOW_06
FX_MODEL_SHOW_07
FX_MODEL_SHOW_08
FX_MODEL_SHOW_09
FX_MODEL_HIDE_01
FX_MODEL_HIDE_02
FX_MODEL_HIDE_03
FX_MODEL_HIDE_04
FX_MODEL_HIDE_05
FX_MODEL_HIDE_06
FX_MODEL_HIDE_07
FX_MODEL_HIDE_08
FX_MODEL_HIDE_09
FX_CINEMATIC_1
FX_CINEMATIC_2
FX_CINEMATIC_3
FX_CINEMATIC_4
FX_CINEMATIC_5
FX_CINEMATIC_6
FX_CINEMATIC_7
FX_CINEMATIC_8
FX_CINEMATIC_9
FX_CINEMATIC_10
FX_CINEMATIC_11
FX_CINEMATIC_12
FX_CINEMATIC_13
FX_CINEMATIC_14
FX_CINEMATIC_15
FX_CINEMATIC_16
FX_CINEMATIC_17
FX_CINEMATIC_18
FX_CINEMATIC_19
FX_CINEMATIC_20
FX_CINEMATIC_MP_1
FX_CINEMATIC_MP_2
FX_CINEMATIC_MP_3
FX_CINEMATIC_MP_4
FX_CINEMATIC_MP_5
FX_CINEMATIC_MP_6
FX_CINEMATIC_MP_7
FX_CINEMATIC_MP_8
FX_CINEMATIC_MP_9
FX_CINEMATIC_MP_10
FX_CINEMATIC_MP_11
FX_CINEMATIC_MP_12
FX_CINEMATIC_MP_13
FX_CINEMATIC_MP_14
FX_CINEMATIC_MP_15
FX_CINEMATIC_MP_16
FX_CINEMATIC_MP_17
FX_CINEMATIC_MP_18
FX_CINEMATIC_MP_19
FX_CINEMATIC_MP_20
FX_MELEE_1_START
FX_MELEE_2_START
FX_MELEE_3_START
FX_MELEE_1_STOP
FX_MELEE_2_STOP
FX_MELEE_3_STOP
FX_STOP_LEFT_HAND_FX
FX_STOP_RIGHT_HAND_FX
FX_PLAYER_VIEW_HIT
FX_ECHO_SCAN_START
FX_POSSESSED
FX_POSSESSED_CANCEL
FX_PLASMA_STUN
FX_ICE_BOMB_STUN
FX_ICE_BOMB_STUN_STOP
FX_ICE_BOMB_STUN_UPGRADED_START
FX_ICE_BOMB_STUN_UPGRADED_STOP
FX_ICE_BOMB_STUN_OVER
FX_ICE_BOMB_STUN_OVER_UPGRADED
FX_BFG_STUN
FX_EQUIPMENT_PULL_STUN
FX_HEAD_SHOT
FX_HEAD_SHOT_MASTERY_SHOCKWAVE
FX_DAMAGE_TAKEN
FX_DAMAGE_SHRAPNEL
FX_DAMAGE_SPLASH
FX_PAIN_STAGGER_STARTED
FX_PAIN_FALTER_STARTED
FX_START_SLOWED_FALTER_PAIN
FX_STOP_SLOWED_FALTER_PAIN
FX_WEAPON_CHAINSAW_START
FX_WEAPON_CHAINSAW_RUN
FX_WEAPON_CHAINSAW_REV
FX_WEAPON_CHAINSAW_CUT
FX_WEAPON_CHAINSAW_SURGE
FX_WEAPON_CHAINSAW_CUT_ENDED
FX_WEAPON_CHAINSAW_CUTTING_FLESH
FX_WEAPON_CHAINSAW_CUTTING_FLESH_ENDED
FX_WEAPON_OVERHEAT_PERCENT_0
FX_WEAPON_OVERHEAT_PERCENT_25
FX_WEAPON_OVERHEAT_PERCENT_50
FX_WEAPON_OVERHEAT_PERCENT_75
FX_WEAPON_OVERHEAT_PERCENT_100
FX_MANCUBUS_STEAM_BLAST_START
FX_MANCUBUS_FLAMES_START
FX_MANCUBUS_FLAMES_STOP
FX_MANCUBUS_FLAMES_ROLLOFF_START
FX_MANCUBUS_FLAMES_ROLLOFF_STOP
FX_DISSOLVE_IN
FX_DISSOLVE_OUT
FX_DISSOLVE_OUT_FOREVER
FX_SYNCED_MELEE_START
FX_SYNCED_MELEE_END
FX_SYNCED_MELEE_FOCAL_ON
FX_SYNCED_MELEE_FOCAL_OFF
FX_SYNCED_MELEE_ATTACK_PROMPT_ON
FX_SYNCED_MELEE_ATTACK_PROMPT_OFF
FX_OUTLINE_ON
FX_OUTLINE_OFF
FX_ABILITY_ACTIVATION_SUCCESS
FX_ABILITY_ACTIVATION_END
FX_ABILITY_ACTIVATION_SUCCESS_LOCAL
FX_ABILITY_ACTIVATION_END_LOCAL
FX_SUMMON_DEMON_IMP
FX_PLAYER_WATER_ENTER
FX_PLAYER_WATER_SWIM
FX_PLAYER_WATER_EXIT
FX_PLAYER_MOVEMENT_STARTED_SPRINTING
FX_PLAYER_MOVEMENT_STOPPED_SPRINTING
FX_PLAYER_MOVEMENT_JUMPED
FX_PLAYER_MOVEMENT_LANDED
FX_PLAYER_MOVEMENT_CROUCHED
FX_PLAYER_MOVEMENT_UNCROUCHED
FX_PLAYER_BERSERK_START
FX_PLAYER_BERSERK_STOP
FX_PORTAL_OPEN
FX_PORTAL_CLOSE
FX_GORE_SPRAY_1
FX_DESTROYER_BLADE_GORE_SPRAY_1
FX_MELEE_TRACE_IMPACT_START
FX_MELEE_TRACE_IMPACT_END
FX_PLAYERDAMAGE_BULLET_CENTER
FX_PLAYERDAMAGE_BULLET_SIDE
FX_PLAYERDAMAGE_MELEE_CENTER
FX_PLAYERDAMAGE_MELEE_SIDE
FX_PLAYERDAMAGE_EXPLOSIVE_CENTER
FX_PLAYERDAMAGE_EXPLOSIVE_SIDE
FX_PLAYERDAMAGE_PLASMA_CENTER
FX_PLAYERDAMAGE_PLASMA_SIDE
FX_PLAYERDAMAGE_FIRE_CENTER
FX_PLAYERDAMAGE_FIRE_SIDE
FX_PLAYERDAMAGE_ELECTRIC_CENTER
FX_PLAYERDAMAGE_ELECTRIC_SIDE
FX_PLAYERDAMAGE_XENON_CENTER
FX_PLAYERDAMAGE_XENON_SIDE
FX_PLAYERDAMAGE_RADIATION_CENTER
FX_PLAYERDAMAGE_RADIATION_SIDE
FX_PLAYERDAMAGE_RADIATION_WARNING
FX_PLAYERDAMAGE_RADIATION_DAMAGE
FX_PLAYERDAMAGE_BFG_CENTER
FX_PLAYERDAMAGE_BFG_SIDE
FX_PLAYERDAMAGE_WOLF_BITE_CENTER
FX_PLAYERDAMAGE_WOLF_BITE_SIDE
FX_PLAYER_DAMAGE_SIPHON_START
FX_PLAYER_DAMAGE_SIPHON_STOP
FX_PLAYER_HEAL_SIPHON_START
FX_PLAYER_HEAL_SIPHON_STOP
FX_PLAYER_DAMAGE_SIPHON_LOCAL_PLAYER_START
FX_PLAYER_DAMAGE_SIPHON_LOCAL_PLAYER_STOP
FX_PLAYER_DAMAGE_TESLA_LOCAL_PLAYER_START
FX_PLAYER_DAMAGE_TESLA_LOCAL_PLAYER_STOP
FX_PLAYER_DAMAGE_SLUDGE
FX_PLAYER_DAMAGE_PLASMA_PUDDLE
FX_PLAYER_DAMAGE_FLAMING_BARREL
FX_PLAYER_DAMAGE_RADIATION_BARREL
FX_PLAYER_DAMAGE_SCREENCRACK_LIGHT_START
FX_PLAYER_DAMAGE_SCREENCRACK_MEDIUM_START
FX_PLAYER_DAMAGE_SCREENCRACK_HEAVY_START
FX_PLAYER_DAMAGE_SCREENCRACK_LIGHT_STOP
FX_PLAYER_DAMAGE_SCREENCRACK_MEDIUM_STOP
FX_PLAYER_DAMAGE_SCREENCRACK_HEAVY_STOP
FX_PLAYER_DAMAGE_BLOOD_1
FX_PLAYER_DAMAGE_BLOOD_2
FX_PLAYER_DAMAGE_BLOOD_3
FX_PLAYER_DAMAGE_BLOOD_4
FX_PLAYER_DAMAGE_BLOOD_5
FX_PLAYER_DAMAGE_BLOOD_6
FX_PLAYER_DAMAGE_BLOOD_STOP
FX_PLAYER_DAMAGE_BLOOD_MEDIUM_CORNERS
FX_PLAYER_DAMAGE_BLOOD_HEAVY_CORNERS
FX_PLAYER_DAMAGE_FLARE_START
FX_PLAYER_DAMAGE_FLARE_STOP
FX_PLAYER_DAMAGE_CACODEMON_BILE
FX_PLAYER_KILLED_PINKY_BULLRUSH
FX_PLAYER_FRIENDLY_SIPHON_START
FX_PLAYER_HOSTILE_SIPHON_START
FX_PLAYER_GROUND_SLAM
FX_PLAYER_GROUND_SLAM_SUPER
FX_HANDS_SLAM_START
FX_HANDS_SLAM_START_SUPER
FX_PLAYERDAMAGE_LIGHT_FROM_N
FX_PLAYERDAMAGE_LIGHT_FROM_NE
FX_PLAYERDAMAGE_LIGHT_FROM_E
FX_PLAYERDAMAGE_LIGHT_FROM_SE
FX_PLAYERDAMAGE_LIGHT_FROM_S
FX_PLAYERDAMAGE_LIGHT_FROM_SW
FX_PLAYERDAMAGE_LIGHT_FROM_W
FX_PLAYERDAMAGE_LIGHT_FROM_NW
FX_PLAYERDAMAGE_HEAVY_FROM_N
FX_PLAYERDAMAGE_HEAVY_FROM_NE
FX_PLAYERDAMAGE_HEAVY_FROM_E
FX_PLAYERDAMAGE_HEAVY_FROM_SE
FX_PLAYERDAMAGE_HEAVY_FROM_S
FX_PLAYERDAMAGE_HEAVY_FROM_SW
FX_PLAYERDAMAGE_HEAVY_FROM_W
FX_PLAYERDAMAGE_HEAVY_FROM_NW
FX_PLAYERDAMAGE_DEEP_WATER_CENTER
FX_PLAYERDAMAGE_DEEP_WATER_SIDE
FX_RESURRECT_START
FX_RESURRECT_STOP
FX_RESURRECT_FAIL
FX_SPAWN_START
FX_SPAWN_STOP
FX_SUMMON_START
FX_SUMMON_STOP
FX_SUMMON_FAIL
FX_DESPAWN_START
FX_DESPAWN_STOP
FX_STATUS_START
FX_STATUS_END
FX_STATUS_LOCAL_START
FX_STATUS_LOCAL_END
FX_PLAYER_STATUS1_START
FX_PLAYER_STATUS1_STOP
FX_PLAYER_STATUS2_START
FX_PLAYER_STATUS2_STOP
FX_PLAYER_STATUS3_START
FX_PLAYER_STATUS3_STOP
FX_PLAYER_STATUS4_START
FX_PLAYER_STATUS4_STOP
FX_PLAYER_STATUS5_START
FX_PLAYER_STATUS5_STOP
FX_PLAYER_SPAWN
FX_PLAYER_ELIMINATION
FX_PLAYER_FAST_TRAVEL_START
FX_PLAYER_FAST_TRAVEL_LOOP
FX_PLAYER_FAST_TRAVEL_STOP
FX_HEALTH_LOW
FX_HEALTH_REALLY_LOW
FX_HEALTH_OKAY
FX_TELEPORT_ENTER
FX_TELEPORT_EXIT
FX_TELEPORT_COOLDOWN_START
FX_TELEPORT_COOLDOWN_END
FX_DETONATE_START
FX_DETONATE_STOP
FX_BURN_1_START
FX_BURN_1_STOP
FX_BURN_2_START
FX_BURN_2_STOP
FX_BURN_3_START
FX_BURN_3_STOP
FX_BURN_ACQUIRE
FX_BURN_LOST
FX_SHIELD_ACTIVATE
FX_SHIELD_SPAWN_ACTIVATE
FX_SHIELD_LOW
FX_SHIELD_POP
FX_SHIELD_HIT_HEAD
FX_SHIELD_HIT_BODY
FX_SHIELD_HIT_LEFTARM
FX_SHIELD_HIT_RIGHTARM
FX_SHIELD_HIT_LEFTLEG
FX_SHIELD_HIT_RIGHTLEG
FX_SHIELD_DEACTIVATE
FX_SHIELD_DEACTIVATE_MAX_DAMAGE
FX_SHIELD_DEACTIVATE_MAX_DURATION
FX_SHIELD_IMPACT
FX_SHIELD_REFLECT
FX_SHIELD_BREAK
FX_SHIELD_BREAK_WORLD
FX_SHIELD_EXPLODE
FX_SHIELD_DAMAGED
FX_SHIELD_CONTACT_DAMAGE
FX_SHIELD_HEALTH_PARM
FX_SHIELD_READY_TO_FIRE
FX_SHIELD_INVULNERABLE_START
FX_SHIELD_INVULNERABLE_STOP
FX_REPAIR_START
FX_REPAIR_STOP
FX_POWER_UP_CHARGING
FX_POWER_UP_INCOMING
FX_POWER_UP_IDLE
FX_POWER_UP_PICK_UP
FX_POWER_UP_PICK_UP_DROP
FX_POWER_UP_START
FX_POWER_UP_STOP
FX_POWER_DOWN_START
FX_POWER_DOWN_STOP
FX_LOCKED_START
FX_LOCKED_STOP
FX_UNLOCKED_START
FX_UNLOCKED_STOP
FX_DSACTIVE_START
FX_DSACTIVE_STOP
FX_DSINACTIVE_START
FX_DSINACTIVE_STOP
FX_SCAN_START
FX_SCAN_STOP
FX_WARNING_START
FX_WARNING_STOP
FX_RUNE_BLOOD_FUELED
FX_RUNE_SEEK_DESTROY
FX_RUNE_AMMO_START
FX_RUNE_AMMO_STOP
FX_FOCUS_START
FX_FOCUS_END
FX_FRIENDLY_LOOP_START
FX_FRIENDLY_LOOP_STOP
FX_HOSTILE_LOOP_START
FX_HOSTILE_LOOP_STOP
FX_INVISIBILITY_START
FX_INVISIBILITY_STOP
FX_GENERICSTATE_1_START
FX_GENERICSTATE_1_STOP
FX_GENERICSTATE_2_START
FX_GENERICSTATE_2_STOP
FX_GENERICSTATE_3_START
FX_GENERICSTATE_3_STOP
FX_GENERICSTATE_4_START
FX_GENERICSTATE_4_STOP
FX_DEMON_CRITHIT_1
FX_DEMON_CRITHIT_2
FX_DEMON_START_LIGHT
FX_DEMON_STOP_LIGHT
FX_DEMON_START_TIMEOUT
FX_DEMON_TIMEOUT
FX_DEMONPRESENCE_START
FX_DEMONPRESENCE_STOP
FX_PROWLER_POUNCE_ENTER
FX_PROWLER_POUNCE_EXIT
FX_PROWLER_ATTACH_RIGHT
FX_PROWLER_ATTACH_LEFT
FX_PROWLER_CURSE_START
FX_PROWLER_CURSE_STOP
FX_PERSONAL_TELEPORTER_ACTIVE
FX_PERSONAL_TELEPORTER_DESTROY
FX_PERSONAL_TELEPORTER_INCOMING
FX_INVENTORY_BOOST_PACK_ACTIVATED
FX_INVENTORY_BOOST_PACK_DEACTIVATED
FX_INVENTORY_GIVE_OVER_TIME_ITEM
FX_STEALTH_FIELD_ENTER
FX_STEALTH_FIELD_EXIT
FX_DOUBLE_JUMP_THIRD_PERSON
FX_CHANGE_TEAM_NONE
FX_CHANGE_TEAM_ONE
FX_CHANGE_TEAM_TWO
FX_CHANGE_TEAM_ENEMY
FX_CHANGE_TEAM_ALLIED
FX_CHANGE_TEAM_NEUTRAL
FX_DESIGNSYS_STARTTOUCH
FX_DESIGNSYS_ENDTOUCH
FX_PICKUP_AMMO_CRATE
FX_PICKUP_ARMOR_SMALL
FX_PICKUP_ARMOR_MEDIUM
FX_PICKUP_ARMOR_LARGE
FX_PICKUP_HEALTH_SMALL
FX_PICKUP_HEALTH_MEDIUM
FX_PICKUP_HEALTH_LARGE
FX_PICKUP_SOULDROP
FX_PICKUP_GENERAL_STOP
FX_PICKUP_RAD_SUIT
FX_PICKUP_OXYGEN_SUIT
FX_SOULDROP_IDLE
FX_SOULDROP_SEEKING
FX_FROZEN_MELEE_HIT_1
FX_FROZEN_MELEE_HIT_2
FX_FROZEN_MELEE_HIT_3
FX_FROZEN_MELEE_HIT_4
FX_FROZEN_MELEE_HIT_5
FX_FROZEN_MELEE_SHATTER
FX_CHARGEBALL_SCORE_FRIENDLY
FX_CHARGEBALL_SCORE_ENEMY
FX_IN_DOMINATION_ZONE
FX_GLORY_SHOCKWAVE
FX_POWERUP_SHOCKWAVE
FX_TELEFRAG
FX_BOSS_START_SIDE_LASER_1
FX_BOSS_START_SIDE_LASER_2
FX_BOSS_START_SIDE_LASER_3
FX_BOSS_START_SIDE_LASER_4
FX_BOSS_START_SIDE_LASER_5
FX_BOSS_START_SIDE_LASER_6
FX_GL_SHIELD_LOAD
FX_GL_SHIELD_SHOOT
FX_GL_SHIELD_COLLIDE
FX_GL_SHIELD_DESTROY
FX_IOS_RIGHT_ARM_ARMOR_DEPLETED
FX_IOS_RIGHT_FOREARM_ARMOR_DEPLETED
FX_IOS_RIGHT_CHEST_ARMOR_DEPLETED
FX_IOS_LEFT_ARM_ARMOR_DEPLETED
FX_IOS_LEFT_FOREARM_ARMOR_DEPLETED
FX_IOS_LEFT_CHEST_ARMOR_DEPLETED
FX_IOS_HEAD_ARMOR_DEPLETED
FX_IOS_TORSO_ARMOR_DEPLETED
FX_GLORY_SPEED_BOOST
FX_GLORY_SAVAGERY_START
FX_GLORY_SAVAGERY_STOP
FX_GLORY_SAVAGERY_START_END
FX_GLORY_SAVAGERY_AOE_START_END
FX_GLORY_SAVAGERY_AOE_LOW_HEALTH_START_END
FX_GLORY_SAVAGERY_START_THIRD
FX_GLORY_SAVAGERY_STOP_THIRD
FX_GLORY_SAVAGERY_START_END_THIRD
FX_GLORY_SAVAGERY_AOE_START_END_THIRD
FX_GLORY_SAVAGERY_AOE_LOW_HEALTH_START_END_THIRD
FX_CACODEMON_SNARE_REEL_IN
FX_ARMOR_SWAP_HEAD
FX_ARMOR_SWAP_TORSO
FX_ARMOR_SWAP_LARM
FX_ARMOR_SWAP_RARM
FX_ARMOR_SWAP_LEGS
FX_ARMOR_SWAP_FULL
FX_DEMONPLAYER_SHIELD_START
FX_DEMONPLAYER_SHIELD_END
FX_DEMONPLAYER_SHIELD_BREAK
FX_DEMONPLAYER_SHIELD_DISSIPATE
FX_DEMONPLAYER_SHIELD_TAKE_DAMAGE
FX_DEMONPLAYER_CACODEMON_IDLE_START
FX_DEMONPLAYER_CACODEMON_IDLE_STOP
FX_DEMONPLAYER_CACODEMON_CHARGE_START
FX_DEMONPLAYER_CACODEMON_CHARGE_STOP
FX_DEMONPLAYER_CACODEMON_SHOOT
FX_DEMONPLAYER_CACODEMON_SNARE
FX_DEMONPLAYER_PINKY_BULLRUSH_BEGIN
FX_DEMONPLAYER_PINKY_BULLRUSH_END
FX_DEMONPLAYER_PINKY_BULLRUSH_GIB
FX_DEMONPLAYER_PINKY_CLOAK_SHIMMER_START
FX_DEMONPLAYER_PINKY_CLOAK_SHIMMER_STOP
FX_DEMONPLAYER_BOUNCEPAD_START
FX_VOLUME_DOT_ENTER
FX_VOLUME_DOT_EXIT
FX_FIRE_MUZZLE_1
FX_FIRE_MUZZLE_2
FX_FIRE_MUZZLE_3
FX_FIRE_MUZZLE_4
FX_BUFF_GENERIC
FX_BUFF_SPIRIT
FX_BUFF_SCREECHER
FX_SHOW_WEAPON_LEFT
FX_SHOW_WEAPON_RIGHT
FX_MAN_ON_FIRE
FX_MAN_ON_FIRE_NAPALM
FX_MAN_ON_FIRE_FLAME_ROUNDS
FX_MAN_ON_FIRE_STOP
FX_MAN_ON_FIRE_UPGRADED_START
FX_MAN_ON_FIRE_UPGRADED_STOP
FX_DESTRUCT_START
FX_DESTRUCT_COLLIDE
FX_DESTRUCT_END
FX_DESTRUCT_SILLYGOOSE_START
FX_DESTRUCT_SILLYGOOSE_END
FX_DEMON_GHOSTING_FIRST_PERSON_START
FX_DEMON_GHOSTING_FIRST_PERSON_STOP
FX_DEMON_DISGUISED_FIRST_PERSON_START
FX_DEMON_DISGUISED_FIRST_PERSON_STOP
FX_DEMON_GHOSTING_THIRD_PERSON_START
FX_DEMON_GHOSTING_THIRD_PERSON_STOP
FX_DEMON_DISGUISED_THIRD_PERSON_START
FX_DEMON_DISGUISED_THIRD_PERSON_STOP
FX_REVENANT_AFTERBURNER_START
FX_REVENANT_AFTERBURNER_END
FX_REVENANT_BARRAGE_CHARGE
FX_REVENANT_BARRAGE_FIRE
FX_REVENANT_JETPACK_OVERHEAT_START
FX_REVENANT_JETPACK_OVERHEAT_END
FX_REVENANT_REDLINE_START
FX_REVENANT_REDLINE_END
FX_DASH_ACTIVATED
FX_DASH_LOGIC_ENTITY_ACTIVATED
FX_DASH_AI_COLLISION
FX_CHAINGUN_DASH_SMASH
FX_ARMORED_BARON_DEACTIVATE_GLOW
FX_ARMORED_BARON_ARMOR_REGEN_WARNING_START
FX_ARMORED_BARON_ARMOR_REGEN_WARNING_STOP
FX_ARMORED_BARON_ARMOR_REGEN
FX_ARMORED_BARON_ARMOR_REGEN_MACE
FX_AI_HEALTH_REGEN_START
FX_AI_HEALTH_REGEN_STOP
FX_AI_HEALTH_GAIN
FX_TRIGGER_ACTIVATED
FX_TRIGGER_DEACTIVATED
FX_TRIGGER_READY
FX_SLAYER_PROTECTION
FX_AI_FRIENDLY_FLAMES
FX_AI_FRIENDLY_FLAMES_2
FX_AI_FRIENDLY_FLAMES_3
FX_AI_DESTRUCTIBLE_THRUSTER_LEFT
FX_AI_DESTRUCTIBLE_THRUSTER_RIGHT
FX_HAMMER_DEBUFF_START
FX_HAMMER_DEBUFF_STOP
FX_PLAYER_SLOWDOWN_BLOODANGEL
FX_PLAYER_SLOWDOWN_BLOODANGEL_HAZARD
FX_PLAYER_SLOWDOWN_SAMUR
FX_PLAYER_SLOWDOWN_PUSPOD
FX_PLAYER_CURSED_PROWLER_START
FX_PLAYER_CURSED_PROWLER_STOP
FX_STOP_PODIUM_EFFECTS
FX_MAX_CONDITIONS
FX_EXTRA_COND_NONE
FX_EXTRA_COND_WEAP_LEFT
FX_EXTRA_COND_WEAP_RIGHT
FX_EXTRA_COND_PRIMARY_FIRE
FX_EXTRA_COND_SECONDARY_FIRE
FX_EXTRA_COND_ALLIED
FX_EXTRA_COND_ENEMY
FX_EXTRA_COND_DAMAGE_LIGHT
FX_EXTRA_COND_DAMAGE_MEDIUM
FX_EXTRA_COND_DAMAGE_HEAVY
FX_EXTRA_COND_QUAD
FX_EXTRA_COND_HELL
FX_EXTRA_COND_TECH
FX_EXTRA_COND_IMPACT_METAL
FX_EXTRA_COND_IMPACT_STONE
FX_EXTRA_COND_IMPACT_WOOD
FX_EXTRA_COND_IMPACT_FLESH
FX_EXTRA_COND_IMPACT_LIQUID
FX_EXTRA_COND_MAX
Texture Modding
A comprehensive guide to creating texture mods for Doom Eternal, from basic to advanced techniques.
Beginner's Guide
Tools You Will Need
- EternalResourceExtractor by PowerBall253 - Download
It is essential that you extract all of the game’s files when working on skins as doing so will allow you to see all of the true file extensions for texture files in the game’s stream database (more on this later), have access to all decl files of all kinds, and be able to see any and every file path to get a greater understanding of where everything is located, which will save you hours of time down the road. - VEGA by DTZxPorter - Download
This is needed to extract both textures (for simpler mods) and models (for more complex ones). - Photoshop - Buy / GIMP - Download
You can primarily edit just the texture images if you choose, but even if you are doing more advanced work, you will need to modify and export normal maps through either of these programs before they will work in game. - Blender (optional) - App Download or Steam Download
If you are going to modify normal maps, you will need to properly ‘bake’ them in blender before injecting them back into the game. Not doing so will cause them to break the lighting and not function properly. - Substance Painter (optional) - Buy
To customize skins at maximum potential, Substance Painter is the route to go for sure. However, it can be expensive, so it will not be essential for making texture mods at base. - Auto Heckin’ Texture Converter by PowerBall253 - Download
All texture files will need to be converted to .TGA with this tool before they can be injected. Self explanatory.
BEFORE GOING ANY FURTHER: Make sure you have uninstalled all mods by deleting them all from your Mods folder and then verifying the integrity of your game files in order to restore them to their vanilla forms. If you do not, then Eternal Extractor will extract the modded versions of any and all files injected instead of their vanilla versions, which is what you will need.
Extracting Resources
Extract the files from the Eternal Extractor zip file directly to your DOOMEternal root directory and run ‘Eternal Extractor.bat.’ Specify an output directory when prompted and it will extract every game file where you want. Done! Just know that the total file size of the files extracted will be identical to the size of your DOOMEternal installation directory and make sure enough disk space is available.
Running VEGA
Extract everything from the VEGA zip file also into your DOOMEternal root directory for the sake of organization. From here, you will need to know a few important folder paths for finding resource libraries to extract from. The most common ones will be gameresources, gameresources_patch1, gameresources_patch2, and warehouse. There are located in this folder path:
DOOMEternal/base
Nice and simple. However, if you need to extract files from individual mission libraries, that will be a little more complicated. Those are located here:
DOOMEternal/base/game/sp
There won’t be many reasons to do this simply for texture modding, but it’s good to know anyway.
Next, you should configure VEGA appropriately. Click on the Options button to set your export preferences. Make sure that VEGA is always looking for just Images and Models. Nothing else will be relevant. If you are working only in GIMP or Photoshop, you can select the DDS image format. You can edit DDS images directly in both apps and since you will eventually be converting DDS images to TGA for injection, doing so will save time. If you are working in Substance Painter, export them as PNG always.
Finally, you will need to be able to know what skin you’re looking for. Files for weapon skins are in folders with keyword identiications, such as “gold” or “astro.” However, all Slayer and Battlemode demon skins are identified by set number.
Slayer textures, regardless of resources library, will be in the following directories:
models/customization/characters/doomslayer/[set number]models/customization/characters/doomslayer_1p/[set number]
Weapons textures, regardless of resources library, will be in the following directory:
art/weapons/[weapon name]/skins/[skin name]
All base campaign demon textures are located in:
gameresources/models/monsters
The overwhelming majority of skins are located in warehouse.resources, but there are still several that you may want to work with located throughout the three gameresources libraries, which is why running the Eternal Extractor will make it much easier for you to find what you’re looking for. Make sure to download the text document from #resources that details all the set numbers before continuing (insert link here). Once extracted, VEGA will put all image files in the exported_files/images folder and all models in the exported_files/models folder. Now, let’s go into a little more detail for each type of skin.
Slayer Skins
For Slayer skins, you will need a total of three sets of textures:
- All textures with _hq in their name from the appropriate folder.
- All textures without _hq in their name from the same folder.
- All 1st person textures from the appropriate doomslayer_1p set folder.
The textures with and without _hq in their name will be visually identical, but different in purpose. HQ textures are used specifically for cut scenes, whereas the corresponding textures without _hq in their names are used for Photo Mode. Both sets should be replaced.
The 1st person textures are, obviously, used in-game from the first person view while you play. On base Slayer-style skins, they will all appear visually different (unique UV wrapping) and will need to be modified separately. For certain skins, such as the Cultist Slayer or Maykr and their variants, most of these files will be identical to the others, but some will still need to be modified separately in order to have a complete mod.
The model files for the 3rd person/cut scene textures of slayer skins are obvious. They will always be named doomslayer_cine_[set number]. You can ignore the _3p variant as it’s basically a redundant version of the same model but with less detail. However, the 1st person model is a bit different and confusing. All 1st person models, regardless of skin, will be called ‘marine’ instead of ‘doomslayer.’ They will not have 1p in the name. You will just need to remember that doomslayer means 3rd person and marine means 1st person. They will, instead, have the formatting marine_[set number]. If you are working in Substance Painter, make sure you extract both.
Best Normal Map Texture Sources:
3rd Person (Photo Mode & Cut Scenes): Same normal maps as the skin you're working on. Also, if working in Substance Painter, make sure you create them on the doom_marine_3p model as it has a small part of the helmet that the doomslayer_cine_3p model does not.
1st Person: Use arm textures from whatever set you are working on. For the Doomblade, Legs, and Torso, search gameresources.resources using SAMUEL for "doomslayer_cine" and extract the textures for that model (it will not have a set number). The Torso, Legs, and Doomblade normal maps for this model match the 1st person UV wraps, but they are much higher resolution.
Weapon Skins
For the weapons, each skin will have all the files specifically altered for that skin, which will not necessarily be every file. Instead, for the majority of skins, certain textures remain the same as default and will be located only in the default skin’s original folder. This generally applies to:
- Shotgun Sticky Bomb Grenade and Full Auto Shells
- Heavy Cannon Precision Bolt Scope Emissive
- Plasma Rifle Glass
- Rocket Launcher Rocket
- Super Shotgun Shells and Hammers (named “mastery;” visually disabled by default)
- Ballista String
- Chaingun Bullets
There will be exceptions, such as the Hot Rod Shotgun, which includes its own orange Sticky Bomb grenade textures, but generally, if you can’t find any necessary files located in the skin folder you wish to use, you will need to replace the ones in the default weapon folder:
gameresources/art/weapons/[weapon name]
Demon Skins
These are mostly straightforward, since almost every in-game demon skin is located in the single directory specified above. However, there are a few exceptions. The textures for the Doom Hunter and Dread Knight are pulled natively from each and every individual mission library for that specific mission. Additionally, all of the green textures for the Cyber Mancubus operate the same way. As such, since you will need to inject your modified textures into each and every mission resources library if you decide to create skins for those demons, having the full directories for them extracted with the Eternal Extractor will help immensely when creating your folder paths.
Preparing Your Files for Injection
Once you have your finished texture files in DDS format, drag and drop them onto the Auto Heckin’ Texture Converter batch file and they will be automatically converted to .tga. You will then need to create your own clone file paths so that Mod Injector will inject the textures and replace the corresponding files in the correct location. Here are some examples:
Example: Plasma Rifle skin
I want my files to replace the textures for the Specter skin, which is in warehouse.resources. First, I make sure that all my new modified image files match the file names of the originals. Then, I create my own empty directory of folders that matches warehouse/art/weapons/plasma/skins/specter. I then put all my converted texture files in the specter folder for injection. I also decided to modify and tint the glass textures, so I create another directory to match where those are located: gameresources/art/weapons/plasma and I put the .tga glass files there. I then take both of those folders, put them in a .zip file, and they’re ready to test!
Example: Slayer Skin
I’m going to have my Slayer skin replace Galaxy Sprinkles, which is set58 and is located in warehouse.resources. Once all my images are converted to .tga, I’ll create this directory:
warehouse/models/customization/characters/
In the ‘characters’ folder, I will make two more folders: doomslayer and doomslayer_1p. In both of those folders, I will create a set58 folder, so that within the characters folder, I will have these two file paths:
doomslayer/set58doomslayer_1p/set58
I will then put all the _hq and photo mode images in the doomslayer/set58 folder and all the 1p images in the doomslayer_1p/set58 folder. I will then make a zip file out of the warehouse folder and the mod will be ready to test!
This concludes the basic guide on how to extract, find, and then prepare images for mod injection. Continuing on, there will be a much more advanced guide on adding custom assets and how that process works, complete with a comprehensive explanation of so-called ‘true’ file formats work and which ones you will need to know. Additionally, there will soon be tutorial videos on how to use Substance Painter and Blender for creating custom skins. Thanks and good modding!
Intermediate Guide: Material2 & Custom Normals
Editing .decl Files
Required Tools:
- Notepad++ - Download
You will need this in order to edit decl files properly. - EternalResourceExtractor by PowerBall253 - Download
If you haven't already done so, it is essential that you use EternalResourceExtractor to extract all the game resources. This will give you access to all decl files of all kinds, and allow you to see any and every file path to get a greater understanding of where everything is located, which will save you hours of time down the road.
Continuing on from the previous guide, we’re now going to talk about editing decl files, why you would do it, what to modify, and what not to modify. We’re going to go through each set of files you can edit for your texture mods one by one, starting off with the most basic and ending with the most specialized. So here we go!
What are .decl files and what do they do?
Decl files declare definitions for the game to utilize in establishing functionality on boot. They do everything from telling the game how to make the Slayer animate properly down to simply what things are named in menus. They control particle colors and appearance, what models are assigned to what entities; basically how everything in the game functions is dictated by these files. They’re extremely important, and, as a result, in addition to purely cosmetic purposes, can also be used to cheat.
.decl files and the new Mod Injector
As of Mod Injector 6.0, modifying certain .decl files that can be used to cheat in the game will disable Battlemode. It is up to you whether to use mods that alter those files or not and the Eternal Mod Manager will let you know if your mods are safe for multiplayer or not. Now, let us get to the most important .decl files you can use to improve and enhance your projects.
Material2 .decl files
Material2 files, at base, declare what textures are assigned to a given part of a model. They exist for all skins of all kinds (Slayer, guns, and demons). These can be modified to assign *any texture* to *any model* and will match the names of the textures being assigned to that part of the model by default. However, assigning textures to a model not created for that model will result in stretching and wrapping in a way that doesn’t match the shape at all, so instead, we’re going to discuss proper usage for positive results.
Slayer files
As we discussed in the previous guide, Slayer skins have textures for every part of the model that they are assigned to. For the sake of simplicity, we’re going to use the Maykr skin as an example. The parts of the models for texture assignment are:
doomslayer_arm_left
doomslayer_arm_right
doomslayer_helmet
doomslayer_knife
doomslayer_launcher
doomslayer_legs
doomslayer_torso
So where do you find these decl files? Regardless of what resource library you’re looking in, all material2 decl files will be located in:
generated/decls/material2
Now, it’s very clear what each of these model parts are and the only difference between the HQ and Photo Mode textures is the _hq suffix in the file name. If you were to replace the Fallen Angel (set41), your textures would be located in:
warehouse/customization/characters/doomslayer/set41warehouse/customization/characters/doomslayer_1p/set41
Since this is set41, the textures will be named doomslayer_arm_left_set41_hq and so on. These are the same names as the material2 decl files and the file path for the textures will also be the same inside the material2 folder:
warehouse/generated/decls/material2/models/customization/characters/doomslayer/set41warehouse/generated/decls/material2/models/customization/characters/doomslayer_1p/set41
If you’d like, you can take some time to locate these files, open them up, take a look at them so you can follow the next sections, and then continue on.
gameresources or warehouse?
Depending on the skin you have chosen to replace, those textures may be in gameresources, gameresources_patch1, gameresources_patch2, or warehouse. If the texture files are in any of the gameresources libraries, it is very likely that the corresponding material2 decl files will be in more than one of them. If this is the case, only the copies in the highest priority .resources file will be loaded by the game and actually affect the given skin. Check this spreadsheet for current resource loading priority.
For example, the material2 decl files for the default skins of every gun are in gameresources, gameresources_patch1, *and* gameresources_patch2. The only ones you want to modify and replace are the copies in gameresoures_patch1, because it is the highest on the resource priority list. If you have chosen a skin in warehouse, the corresponding material2 files will be there or in warehouse_patch1.
We will now discuss both what you can modify and what you *should* modify to get the job done.
material2 modification
The text of these decl will look similar to this:
{
inherit = "template/pbr_gun";
edit = {
	RenderLayers = {
		item[0] = {
			parms = {
				heightmap = {
					filePath = "textures/system/constant_color/grey_md.tga";
					options = {
						type = "TT_2D";
						filter = "TF_DEFAULT";
						repeat = "TR_REPEAT";
						format = "FMT_BC1";
						atlasPadding = 0;
						minMip = 0;
						fullScaleBias = false;
						noMips = false;
						fftBloom = false;
					}
				}
				smoothness = {
					filePath = "art/weapons/combatshotgun/skins/hotrod/combatshotgun_barrel_g.tga";
				}
				normal = {
					filePath = "art/weapons/combatshotgun/skins/hotrod/combatshotgun_barrel_n.tga";
				}
				specular = {
					filePath = "art/weapons/combatshotgun/skins/hotrod/combatshotgun_barrel_s.tga";
				}
				albedo = {
					filePath = "art/weapons/combatshotgun/skins/hotrod/combatshotgun_barrel.tga";
				}
			}
		}
	}
	Parms = {
		wetnessdroptiling = 4;
	}
	SurfaceType = "SURFTYPE_METAL";
}
}
This is the combatshotgun_barrel material2 file for the Hot Rod Shotgun skin. The primary section to focus on first is the “parms” at the top, specifically the fields titled heightmap, smoothness, normal, specular, and albedo. You will notice that the primary purpose of this file is to assign the textures of this skin by declaring the file paths for each of them. These are, typically, what you will modify and what we will cover first.
Modifying File Paths
It is always recommended that you replace weapon skins in warehouse.resources. There are two reasons for this:
- If you are declaring different file paths, it is pointless to do so for textures replaced in the gameresources libraries.
- The combined file size of mods injected into warehouse.resources is far greater than that of the gameresources libraries. This is because all three libraries are actually all part of the same ‘mapresources’ library, common.mapresources. This means that common.mapresources has a far greater initial load and is far less tolerant of increased size. In contrast, warehouse.resources is the only resources library in the warehouse.mapresources library and will tolerate significantly more.
So why would you want to modify file paths? Well, the majority of skins located in warehouse are from event series and, thus, many players who recently purchased the game could very easily not have access to the skin you are replacing. As a result, you will want to change the file paths for a base campaign skin such as Crimson, Midnight, or even Default so that it will use the textures for said event skin and all players who have not unlocked that skin will be able to use your mod. (NOTE: If you are editing the Skullface skin, one of the Maykr skins, or any other skin that has a completely different model, you cannot reassign it to a campaign skin using this method. The method for doing so will be covered in the advanced guide if you want to skip this method and continue there. For all default-style skins, however, that method will typically not be necessary and you may use either based on your personal preference).
So, how is this done? Well, let’s return to the Hot Rod Shotgun skin and use it here as well. If you return to the example, you will notice that the file paths declared always start with the names of folders within the resources libraries and do not begin with the name of the resource library itself. This is because if a folder path is not located in the resource library, it will search the others to locate it in order of load priority. Check this spreadsheet for current resource loading priority.
This load priority will be relevant in the advanced guide, but for now, you can ignore it. However, each given resource library will always search itself first, as you would expect. The Hot Rod skin is located in warehouse and, thus, the corresponding decl files will search warehouse, find the textures in the declared file paths, and assign them to the model. However, if you were to modify a decl file in gameresources_patch2 for a Shotgun skin located in common.mapresources to the file path for the Hot Rod skin, it would fail to find it in gameresources_patch2, eventually search warehouse, and load those textures. For the purposes of this guide, we will use the default Shotgun skin. The declared file paths of the default combatshotgun_barrel file (combatshotgun_barrel.decl located in gameresources_patch2/generated/decls/material2/art/weapons/combatshotgun) will look like this:
smoothness = {
	filePath = "art/weapons/combatshotgun/combatshotgun_barrel_g.tga";
}
normal = {
	filePath = "art/weapons/combatshotgun/combatshotgun_barrel_n.tga";
}
specular = {
	filePath = "art/weapons/combatshotgun/combatshotgun_barrel_s.tga";
}
albedo = {
	filePath = "art/weapons/combatshotgun/combatshotgun_barrel.tga";
}
“Smoothness” will correspond to your “glossiness” layer in Substance Painter if you are using it for your textures (_g). Normal and Specular are self-explanatory, but “albedo” refers to your Diffuse layer. So, we will now modify the parms to use the Hot Rod textures instead, which will make them identical to the parms of the Hot Rod decl file:
smoothness = {
	filePath = "art/weapons/combatshotgun/skins/hotrod/combatshotgun_barrel_g.tga";
}
normal = {
	filePath = "art/weapons/combatshotgun/skins/hotrod/combatshotgun_barrel_n.tga";
}
specular = {
	filePath = "art/weapons/combatshotgun/skins/hotrod/combatshotgun_barrel_s.tga";
}
albedo = {
	filePath = "art/weapons/combatshotgun/skins/hotrod/combatshotgun_barrel.tga";
}
The main drawback to this method is that your textures will replace both the textures for Hot Rod and Default. However, since you are doing this for the benefit of those that do not have the Hot Rod skin, it can be entirely forgiven. To inject these decl files, you will create the file path gameresources_patch2/generated/decls/material2/art/weapons/combatshotgun, place the files in this new combatshotgun folder, add the gameresources_patch2 and inject! Your skin will now replace the default skin and be usable for everyone! For most skins, this is all that will be required. For this method, there is no need whatsoever to ever inject custom normal maps. The vanilla normals will work just fine for your purposes. However, if you are using Substance Painter and you have added additional detail from the skin you have created, you may want to use your own custom normal maps. For those of you to whom this applies, continue on to the second half of this guide.
Custom Normal Maps
Required Tools:
- SAMUEL by SamPT - Download
To ensure the best possible results, you will want to use SAMUEL to specifically extract Normal Maps. This is due to encoding that will be explained briefly. For all other textures, VEGA will do the trick, but you may elect to use SAMUEL for all your textures and simplify the process. - VEGA by DTZxPorter (optional) - Download
See above. - GameImageUtil by Scobalula - Download
You will use this program on normal maps extracted by SAMUEL to make them usable in Substance Painter. - Substance Painter/Photoshop
You will use either one of these programs or both to create the modified Normal maps. - Auto Heckin’ Texture Converter by PowerBall253 - Download
You will use this to convert your Normal maps from Substance Painter to work properly in game.
Before we get started, I will give a brief history of modifying normal maps for Doom Eternal, as it will help you better understand file formats, which is helpful information for best understanding the whole process. At the beginning of texture modding, we found that textures (aside from Normal Maps), need to be encoded as "BC1a" DDS files before using Divinity Machine (now a part of the Texture Converter) to make the TGA files for injection. As a result, VEGA extracted all image files (including Normal Maps) as BC1a and Divinity Machine encoded them as BC1a for injection as well. Normal Maps produced by this process looked visually identical to the Normal Maps from the game in terms of the dark red and green hues, but they would break in game, resulting in terrible, inconsistent lighting.
To compensate for this undesired outcome, a time-consuming, complicated process was devised involving Blender and Photoshop to brighten the hues of red and green, which actually caused them to work in game. So why was this the case?
The red and green in Normal Maps are not processed as colors. Instead, a complex algorithm converts them to information that is used by the game to simulate lighting and reflections. This is why the encoding format and hues of the Normal Map are critical. The process we used for the majority of a year, however, created a problem of its own: Compressed Normal Maps that produced pixelation and loss of information, making shiny surfaces look choppy and wavy; a complete mess. We spent months trying to fix this issue to no avail. However, a solution was eventually discovered and, as it turned out, that solution was impossible for us to find where we were looking because it happened at the beginning before our process of extraction even began.
As mentioned at the beginning, VEGA was extracting Normal Maps as BC1a because it was deduced that they must be BC1a because all other textures required BC1a encoding. This was, however, completely wrong. The normal maps, in fact, required BC5 encoding to work properly and, as of now, SAMUEL is the only app that will give this proper encoding. With it, there is no more damage to the Normals or loss of information at the outset and, using the process which I will now outline, will not be lost in the end product you see after injection.
Creating Your Custom Normal Maps
- Use SAMUEL to extract your desired Normal Maps. You will notice that these normal maps are in only red and green, which is what Doom Eternal uses. However, they will also require blue in order for Substance Painter to use them properly and, later, export them in a usable state (to understand how to properly utilize and export normal maps in Substance Painter, make sure to watch the tutorial video also posted on this wiki).
- Run GameImageUtil. In the drop down at the top, select the last option: “XY.” Drag and drop your DDS BC5 Normal Map onto the app window and it will export a BC5 PNG with blue added in the same folder as your DDS image.
- Run Substance Painter. Import your Normal Maps, create your skin, and then export your customized Normal Maps (PNG).
- Open your PNG file in Photoshop and save it with DDS encoding. Whether you are using a simple Intel plugin or the NVIDIA encoder, select “8 bit BC5” from your list of options and save the file with the appropriate name (e.g., combatshotgun_barrel_n.dds for the example in the previous section).
- Drag and drop your DDS file onto the Auto Heckin’ Texture Conerter .bat file and it will convert it to a BC5 .tga file ready for injection. Congratulations! You’ve just created your own custom Normal Map and, when paired with the material2 replacement method, it’s now available for everyone to use!
Coming up in the Advanced Guide, we will discuss a more complex method for assigning event textures to campaign skins and taken on the most complicated process of all: Adding new custom assets. See you there!
Advanced Guide: Advanced Customization & New Texture Creation
Tools You Will Need
- Substance Painter - Buy (30-day trial)
The most common custom textures created for gun and Slayer skins are emissives, which can only properly be created in Substance Painter. - Notepad++ - Download
You will need this for both decl modification and JSON creation, which will both be covered. - EternalResourceExtractor by PowerBall253 - Download
If you have not already run this, it is absolutely essential that you do so now so that you will be able to read the "true" file extensions of the .tga files you will need to use for custom textures. - Resource Priority List - View on Google Sheets
This file lists all the .resources files in the game, in order of priority. When a file exists in multiple .resources, it will be overwritten by the one highest on this list. This is important when we discuss how and where to inject custom textures.
Advanced Skin Replacement
In the previous guide, we covered how to replace skins using material2 decl files, but now we will cover the advanced method for doing so, which is cleaner, simpler, and much more effective. Returning to the Hot Rod skin from earlier, we will ignore the material2 files under the assumption that, for now, you are merely replacing pre-existing textures.
Instead, go to this file in your extracted resources:
warehouse/generated/decls/warehouseitem/weapon_skin/combatshotgun/combatshotgun_skin_hotrod.decl
This is what we will call a 'warehouseitem' decl after the name of the folder. What does this do? It declares to the game what 'gameitem' decl file it will use for each skin listing on the customization menu. What is a gameitem file? A gameitem file declares to the game what model--enumerated for each individual part of the model--it will use for the skin that corresponds to that gameitem. It pairs with the md6def decl, which declares what each model is. However, it is not necessary to modify the gameitem or md6def files for this purpose. Via this new method, only the warehouseitem file will be necessary. Returning to the Hot Rod warehouseitem decl file, opening it in Notepad++ will show you this text:
{
	edit = {
		warehouseItemClass = "WIC_WEAPON_SKIN";
		clientAwarded = true;
		qualityTier = "QUALITY_TIER_1";
		displayName = "#str_decl_cosmetic_slayer_skin_praetor_name_GHOST70738";
		description = "#str_decl_cosmetic_customization_milestone_item_description_GHOST67788";
        icon = "textures/guis/icons/weapons/simple/shotgun";
		targetWeapon = "weapon/player/shotgun";
		gameItem = "weapon_skin/combatshotgun/combatshotgun_skin_hotrod";
	}
}
Unlike the material2 decls, almost all of these lines are relevant, including the most advanced touches for really giving your skins a unique flair. For now, however, we will focus on the final 'gameItem' line. Using this method, you can replace a campaign unlock skin in either warehouse or common, but for the sake of consistency, we will replace the Shotgun Praetor skin, which is located here:
gameresources/generated/decls/warehouseitem/weapon_skin/weapon_skin_milestone_master_combat_shotgun.decl
Opening this file, if you look at the same gameItem line, you will see this:
gameItem = "weapon_skin/weapon_skin_milestone_master_combat_shotgun";
The easiest way of thinking about this is that the gameItem line essentially assigns which skin (and model) to which to each menu entry. So, with your custom skin already replacing the textures for Hot Rod, you simply need to copy the gameItem line from the Praetor warehouseitem decl and paste it into the Hot Rod warehouseitem decl, resulting in this:
{
	edit = {
		warehouseItemClass = "WIC_WEAPON_SKIN";
		clientAwarded = true;
		qualityTier = "QUALITY_TIER_1";
		displayName = "#str_decl_cosmetic_slayer_skin_praetor_name_GHOST70738";
		description = "#str_decl_cosmetic_customization_milestone_item_description_GHOST67788";
		icon = "textures/guis/icons/weapons/simple/shotgun";
		targetWeapon = "weapon/player/shotgun";
		gameItem = "weapon_skin/weapon_skin_milestone_master_combat_shotgun";
	}
}
Add this file and its folder path listed above to your mod and, when injected, you will have the same result as before in a much simpler and more streamlined fashion. However, your skin will still be replacing both Hot Rod and Praetor. Unlike before, however, there is a solution to this when using this method. All you have to do is copy the gameItem line from the Hot Rod warehouseitem file and paste it over the gameItem line of the Praetor warehouseitem file. Adding this decl file and its folder path to your Mod will now cause the Praetor skin to replace Hot Rod, which will result in the player having both the Praetor skin and your custom skin. So why, if this method is much simpler, was it saved for the Advanced Guide? Well, that's because there is a lot more you can do with the warehouseitem decl file, which we will now discuss.
Custom Skin Names and Quality Tiers
Let's say you made a really cool glowing read and orange glowing Shotgun. You spent a lot of time getting the metal textures and the emissives just right so that the whole thing looks like superheated steel. After all that effort, you've decided to call this the "Forge Steel Shotgun." But what if, instead of just listing it on your mod page with that name and naming the zip file as such, you could actually have it listed in the game as the Forge Steel Shotgun? Well, that's exactly what you can do with the method we'll now go through.
Referring back to the Praetor warehouseitem files, take a look at these two lines:
displayName = "#str_decl_cosmetic_slayer_skin_praetor_name_GHOST70738";
description = "#str_decl_cosmetic_customization_milestone_item_description_GHOST67788";
It is immediately obvious that these two lines are declaring the name and description of the Praetor skin in the Customization menu, but what exactly is going on with the actual text? Well, those items starting with # are strings. Strings, as those familiar with code will already know, are lines of text. Specifically, #str_decl_cosmetic_slayer_skin_praetor_name_GHOST70738 contains the text "Praetor," which is why that is the name displayed on the menu in game. So what are we supposed to do? Export that string and change the text? No. That would be very complicated and time consuming. Instead, we're just going to make up our own strings with these easy steps:
1) Look at the load priority list. As of the current patch (6.66 r-1), the library with top priority is gameresources_patch1, so this is where you will put your strings. Regardless of what what library has top priority, you will need to put your strings in whatever it is at the top of the list. If not, the game will not load them. If you do not already have a gameresources_patch1 folder as part of your Mod, create the folder, then, in gameresources_patch1, create the following path: EternalMod/strings
2) Open Notepad++ and create a new file. Click Language>J>JSON. This is where we will create our new strings.
In the JSON file, create this template:
{
	"strings":
    [
		{
			"name": "";
			"text": "";
		}
	]
}
Save the file as "string template.json" so that you can customize it again and again going forward. This clause will be used for each individual string you create. So, let's do what we mentioned earlier and rename your awesome Forge Steel Shotgun. We do it just like this:
{
	"strings":
    [
		{
			"name": "#str_forge_name";
			"text": "Forge Steel Shotgun";
		},
		{
			"name": "#str_forge_desc";
			"text": "A Shotgun Forged From Hardened Darksteel";
		}
	]
}
Make sure you always put a comma after the closing bracket for each string if you have more that follow (reference: },) or Mod Injector will produce an error and not use the strings. Now save this file in gameresources_patch1/EternalMod/strings as "english.json." If you want to check to make sure you don't have any errors, you can use https://jsonlint.com/ by pasting your code into the blank in the middle of the page and clicking "Validate JSON." Sometimes, it will identify errors that aren't actually errors because of the specialized code we use for Doom Eternal, but you will learn to identify what errors are real and which ones are false. To test these things out, You can inject the file and if errors appear, test it then.
Returning to the warehouseitem file, you will change those two lines we mentioned earlier to use the string names from your JSON file like this:
displayName = "#str_forge_name";
description = "#str_forge_desc";
Now, with these changes in place, your textures that replace the Hot Rod skin will show up as the Praetor skin and by modifying the name and description of the Praetor skin, it will be called "Forge Steel Shotgun" and on the right side of the screen, instead of saying that it was unlocked for milestone completion, it'll tell everybody how cool it really is.
Let's be honest, though. The Praetor skin is Quality Tier 1, bronze. Your skin is not a third place medal. It's your most impressive skin yet. It deserves the highest tier, doesn't it? Return to this line:
qualityTier = "QUALITY_TIER_1";
Changing it to 2 will make it silver, and changing it to 3 (which is what you're going to do) makes it gold. And there you go. You're all set... or are you?
If you like, you can use the ^1^7 name color codes used for assigning colors to your username in any number of modern video games and add them to your name text. Reference the codes in the String Customization page.
You'd probably go with yellow or red, making the new name ^1Forge Steel Shotgun^7 or ^3Forge Steel Shotgun^7. And that's everything to do with customizing your skin for your best appearance in game. Now, finally, we get to the biggest means of creating your own skin really your own: Brand new textures of your own creation.
Custom Textures
This is where you absolutely must run the most recent version of the Eternal Extractor, which no longer simply extracts "texture" files from the game as *.tga files, but with, as I've mentioned several times now, their true file extensions. So what are those file extensions and why are they necessary? After all, when you inject your files to replace textures, you just have to convert them to .tga files, right? Well, this gets down to how Mod Injector actually works. As it turns out, Mod Injector locates the file with the same name in the folder path you create within your zip file and uses .tga as shorthand because that's all Mod Injector needs to replace textures that already exist. Adding new textures that don't have anything to replace is a different story. How different? Dramatically.
Going back to the Hot Rod Shotgun file name for an example, these are the files you would most commonly replace for any given weapon skin:
combatshotgun_barrel.tga
combatshotgun_barrel_e.tga
combatshotgun_barrel_g.tga
combatshotgun_barrel_n.tga
combatshotgun_barrel_s.tga
The true file extensions are:
combatshotgun_barrel.tga$streamed$mtlkind=albedo
combatshotgun_barrel_e.tga$bc1srgb$streamed$mtlkind=bloommask
combatshotgun_barrel_n.tga$streamed$mtlkind=normal
combatshotgun_barrel_s.tga$streamed$mtlkind=specular
There's one file missing though, and that's combatshotgun_barrel_g.tga. Well, that's because this is the true file extension for the "smoothness" layer:
combatshotgun_barrel_g.tga$smoothnessnormal=art/weapons/combatshotgun/skins/hotrod/combatshotgun_barrel_n.tga$streamed$mtlkind=smoothness
This is brought up simply because it's comical; you will probably never have to use it. However, it's important to understand the format of these files. The reason these files have such esoteric extensions is because the vanilla files aren't actual images; they're essentially 'shortcuts' that direct the game to the actual textures, which are resized to fit your video settings and streamed live from the streamdb libraries, which you view alongside these resource libraries in the DOOMEternal/base folder.
Now, the most common file you will be creating and adding to the game is emissive textures for parts of models where they don't already exist. So, how do we do this? Well, after you've exported your Emissive texture from Substance Painter (for the Hot Rod Shotgun Barrel, obviously), you want to open in it in Photoshop or GIMP and save it as a DDS with the proper name:
combatshotgun_barrel_e.dds
You'll then use the Texture Converter to make combatshotgun_barrel_e.tga. At this point, you need to make sure you put it in the right place, so where is that, exactly? You will want to inject your textures in the highest patch number of the library your skin is in. Currently, that is gameresources_patch1 and warehouse_patch1.
For our current example, create a clone of your Hot Rod skin path in warehouse_patch1: (art/weapons/combatshotgun/skins/hotrod) and in the EternalMod folder, create an 'assetsinfo' folder.
Amend the file extension appropriately:
combatshotgun_barrel_e.tga$bc1srgb$streamed$mtlkind=bloommask
Create another new JSON file in Notepad++ and, once again, create the following template and save it as "image template.json":
{
	"assets":
    [
		{
			"resourceType": "image",
			"version": 21,
			"name": "",
			"mapResourceType": "image"
		}
	]
}
Then modify it so that it will add your emissive texture properly:
{
	"assets":
    [
		{
			"resourceType": "image",
			"version": 21,
			"name": "art/weapons/combatshotgun/skins/hotrod/combatshotgun_e.tga$bc1srgb$streamed$mtlkind=bloommask",
			"mapResourceType": "image"
		}
	]
}
If you are adding multiple emissive textures, you'll do the same thing as with strings by adding a comma to the closing bracket of the asset (reference: },) and then type the next one. Save this as "warehouse.json" in the warehouse_patch1/EternalMod/assetsinfo folder. The reason why you need to use the full file extension here in the JSON file (and, subsequently, why your texture file needs the full extension) is because it needs to be added to the game's "table" of image textures so that it can be identified by decl files and then assigned to the actual skin. This brings us to the final step.
Acquire warehouse/generated/decls/material2/art/weapons/combatshotgun/skins/hotrod/combatshotgun_barrel.decl and open it. Above the 'smoothness' item parm, you'll want to add a 'bloommaskmap' item parm to assign your new emissives like this:
bloommaskmap = {
	filePath = "art/weapons/combatshotgun/skins/hotrod/combatshotgun_barrel_e.tga";
}
When the game fails to find the texture in warehouse, it will immediately find it in warehouse_patch1 and you'll be all set. Save the file in your own created copy of the file path specified above and, as always, put all your folders in a zip and inject! If you've made any errors in the JSON or decl files, you'll need to make edits to clear them up. If a JSON file has an error, it'll show up in Mod Injector and if there's an error in a decl file, you'll get an error message when the game tries to launch telling you exactly what decl file it is. Don't worry; this is a pretty common mistake. However, once everything is working, you've got your perfect skin modeled exactly how you want it for everyone to admire and enjoy!
Congratulations! You've finished the entire guide and you should be all set to make skins! If you haven't already, make sure to watch the tutorial video on Substance Painter that accompanies these guides so that you can be ready to do everything in between all these technical steps. Thanks and happy modding!
See Also
Getting Started in Substance Painter
In this video, I outline how to get your models into Substance Painter, use Normal Maps, bake your Mesh Maps, and everything else you need to get your project off on the right foot!
Model Modding
Information on how to use custom models in the game.
Importing Custom Models
Required Tools:
Doom Eternal Model Importer by SamPT - Download
Converts .OBJ format models into the .LWO format used by DOOM Eternal.
Blender - Download
Open-source 3D modeling software.
Blender is highly recommended, but other 3D-modeling software may also work.
How to Import Custom Models:
First, download the "Doom Eternal Model Importer" tool and run it. You will see a screen like this: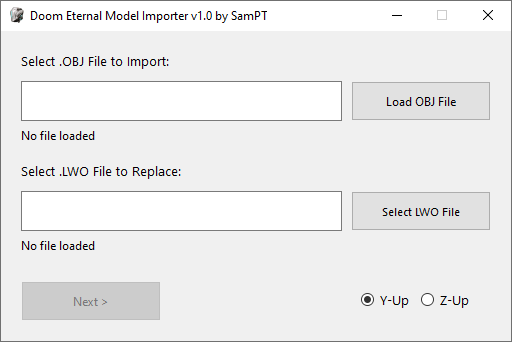
Follow these steps:
1. Click "Load OBJ File" and select the .obj file you want to import.
2. Click "Select LWO File" and select the .lwo file you want to replace - this opens a 2nd window which is similar to SAMUEL, so you can browse the game .resources.
3. Click the "next" button and you'll see a screen like this:

4. Select the material2 .decl you want to use for this model (sometimes there will only be one option). Make a note of the file you picked, because this controls which textures will be loaded for the model.
5. Click "Import Model" - this will convert your .obj file to the .lwo format. Your new .lwo model will be saved to a folder called imports, this will be in the same directory as the model importer tool:

6. Open the imports folder and look for a folder named after the model you replaced (along with some numbers). In this example, the file we replaced was called vial.lwo, so the imported model was saved in a folder called vial_id#15109803643372197552.
7. Open that folder (e.g. vial_id#15109803643372197552) and you'll see two more folders inside. One will be called streamdb and the other will be the name of a ".resources" archive, such as gameresources.

8. Copy and paste both of these folders directly into your Doom Eternal mods folder. (If distributing the mod, you should put them in a .zip file first). This folder contains everything you need to see the model replaced in the game.
9. Run EternalModInjector.bat and you should see the new model in the game.
Important: Custom models will not work with outdated versions of EternalModInjector. To avoid problems, you should add the EternalMod.json file to your completed mod, and set the minimum required version to 19. This will display a warning if someone tries to use your mod with outdated tools.
General Tips / Advice:
- Remember, the model is just the "shape" of the item. In most cases you will also need to replace textures. This isn't handled by the model importer tool. You would do this the same way you'd normally create a texture mod. See the Texture Modding guide for more information.
- If your imported model is facing sideways in the game, try changing the Y-up / Z-up setting on the first screen of Doom Eternal Model Importer.
- If the model you import is too large or small, you need to edit the model with a 3d modeling tool such as Blender. Use this tool to scale your model to the proper size before importing it into the game. (To get an idea of the correct size, you can export a "vanilla" model from the game with SAMUEL, and open that model in Blender, alongside your new one. This will give you a good size comparison).
- When exporting to .obj format from Blender, you should make sure these settings are checked (at minimum):


Note: The current version of the model importer only supports static models (.lwo format). Animated models (.md6mesh format) are not supported yet, so it is not possible to replace things like weapons or enemy models directly. However, you can attach static .lwo models to .md6mesh models to achieve a similar effect. See here: Attaching Static Models to Animated Models
See Also:
- Attaching Static Models to Animated Models
- How to use the "EternalMod.json" file
- Texture Modding guide
Attaching Static Models to Animated Models
Hiding Animated Models:
Find material2 decls for what parts of a model to hide. Replace everything in the decl with the following.
{
	inherit = "template/editor/worldeditor";
	edit = {
		Parms = {
			texturemap = {
				filePath = "art/tile/common/nodraw.tga";
				options = {
					type = "TT_2D";
					filter = "TF_DEFAULT";
					repeat = "TR_REPEAT";
					format = "FMT_RGBA8";
					atlasPadding = 0;
					fullScaleBias = false;
					noMips = false;
					fftBloom = false;
				}
			}
		}
		EditorData = {
			editorImagePath = "art/tile/common/nodraw.tga";
		}
	}
}
This decl can be found in various .resources files at art/tile/common/nodraw.decl. It makes the textures assigned to it unable to see in game.
Attaching Static Models:
It is important to make sure your custom model replaces an existing model that doesn't interfere with gameplay and hasn't been used in a different mod before. Using various mods together that replace the same model for different uses can cause several problems.
When publishing a mod that replaces a static model, you should indicate which static model you replaced. This can help diagnose or avoid compatibility issues with other mods.
Find the FX decl used for the certain model. An easy way to find most of them is to check the fxDecl parameter in most entitydef decls.
In the FX decl, add a new item that uses this example as a base:
			item[11] = { // Change the item number when needed
				name = "assault_rifle";
				group = "fire";
				type = "FX_MODEL";
				looping = true;
				originType = "FX_ORG_TRACK_POS";
				rotationType = "FX_ROT_TRACK_AXIS";
				modelParms = {
					staticModel = "art/kit/hub/prop/pizzabox.lwo"; // The model that will be replaced. When changing the filepath, make sure to add any extra parameters in the .lwo extension if necessary
				}
			}
After adding the new item to the FX decl go to the top of the decl and change "num = <number of items>;" by how many items you added.
Optional Parameters:
- renderWithGunFov - Keeps the custom weapon model at the same position as the FOV. This parameter will have to be added in the ModelParms section of the FX item.
renderWithGunFov = true;
- size - Changes the size of the model.
size = 0.165000007;
- offset - Changes where the model is located.
offset = {
	x = 0;
	y = 0;
	z = 0;
}- rotOffsetAngles - Rotates the model.
rotOffsetAngles = {
	yaw = 0;
	pitch = 0;
	roll = 0;
}- tagNames - Moves the model to a specific body part. Most tags can be found in the FX decl.
tagNames = {
	num = 1;
	item[0] = "muzzle";
}- startCondition and stopCondition - Changes the condition of when the model shows and stops. A full list of conditions can be found in the FX CONDITIONALS page.
startCondition = {
	num = 1;
	item[0] = "FX_WEAPON_BEGIN_RAISE";
}
stopCondition = {
	num = 2;
	item[0] = "FX_WEAPON_BEGIN_LOWER";
	item[1] = "FX_WEAPON_BEGIN_RAISE";
}
Adding Rain FX:
Find the material2 decl for the weapon model you replaced earlier and add the following to the first line of the decl.
inherit = "template/pbr_gun";
Next, you'll have to add the following to the Parms section of the decl.
wetnessdroptiling = 4;
Your material2 decl should look something like this.
{
	inherit = "template/pbr_gun";
	edit = {
		RenderLayers = {
			item[0] = {
				parms = {
					bloommaskmap = {
						options = {
							format = "FMT_BC4";
						}
					}
					colormask = {
						filePath = "textures/system/constant_color/black_noalpha.tga";
						options = {
							type = "TT_2D";
							filter = "TF_DEFAULT";
							repeat = "TR_REPEAT";
							format = "FMT_BC1";
							atlasPadding = 0;
							fullScaleBias = false;
							noMips = false;
							fftBloom = false;
						}
					}
					smoothness = {
						filePath = "textures/system/constant_color/grey_dk.tga";
					}
					normal = {
						filePath = "art/kit/hub/prop/pizzabox_n.tga";
					}
					specular = {
						filePath = "textures/system/specular/flatspec_35.tga";
					}
					albedo = {
						filePath = "art/kit/hub/prop/pizzabox.tga";
					}
				}
			}
		}
		Parms = {
			wetnessdroptiling = 4;
			surfaceemissivecolor = {
				y = 0.690196097;
				z = 0.160784304;
			}
			blendheightmapscale = 4;
		}
	}
}
String Modding
Information for people who are looking to create mods that affect Text.
String Customization
Strings can be customized to help specific characters stand out.
String customization applies to both BLANG files and idGuiEntity_Text entities.
Available Colors
Start with ^ then a character from the list below, then end with ^7
Ex: "^5sample text^7" (without quotations) This will make the text teal.
^a - Gold
^b - Light Blue
^c - Green Yellow
^d - Orange
^z - White
^0 - Black
^1 - Red
^2 - Green
^3 - Yellow
^4 - Blue
^5 - Teal
^6 - Purple
^7 - White
^8 - Gray
^9 - Black
In general, helpful tips are colored teal, dangerous threats are colored red.
Spacing
\n - New Line
\t - Tab
Examples
^2Green Yellow^7 -> Green Yellow
^1Red^7 ^aGold^7 -> Red Gold
^1R^7^da^7^3i^7^2n^7^5b^7^bo^7^6w^7 -> Rainbow
This is a ^5sample^7 tip -> This is a sample tip
First line\nSecond line -> First line
Second line
Sample\tText -> Sample Text
Up to 9 separate color identifiers can be present in one string line.
Any additional colorization will cause some to be ignored.
See Also
Video Modding
Information for people who are looking to create video mods.
Creating Video Mods
Video modding is currently not supported by the Eternal Mod Injector.
Make sure to backup your video files before editing them.
Extracting Tools:
The RAD Video Tools by Epic Games Tools - Download
Finding a Video to Replace:
Every video file can be found at base\video in the DOOMEternal installation directory. Each video uses the .bk2 format. The only way to view .bk2 files is to open them in RAD Video Tools.
- Right click on the video you want to play ( ex: base\video\tutorial_core_loop_summary.bk2 )
- Hover over Open with and click RAD Video Tools.
- A separate window will open up, showing the video you clicked on.

The GUI of the Context Menu might look different depending on the OS you are using.
This screenshot is from a Windows 11 GUI.
Converting a Video into the .bk2 Format
RAD Video tools can convert many different kinds of video formats into .bk2.
They are compatible with most video formats such as: .mp4 .gif .mov .wmv .avi
- Open RAD Video Tools
- Left click the video you want to convert to .bk2
- Left click Bink it!

- A new window will appear. The Bink Compressor provides options for changing the settings of your video before converting it. Leave them to their default value.
- Change the text under Output file info: to the name of the video you want to replace.
Make sure to add .bk2 as the file extension. - After you finish naming the file, left click Bink located on the right side of the window. Your video will start processing into a .bk2 video file. The video should be saved in the same folder your original file was in.

Replacing the Existing Video File
Make sure to create a backup for the original video file and store it somewhere safe.
If you fail to restore the original file, you will need to Verify File Integrity from your client.
- Go back to the file path where you originally found the video you want to replace
( ex: DOOMEternal\base\video\tutorials ) - Put your new .bk2 file into the file path, and replace the vanilla file.
- Run DOOM Eternal like normal, no Eternal Mod Injector needed.
To restore the original video, simply replace your modified .bk2 file with the vanilla file.